The Scenario
For our scenario, we have a document library named "Documents". We have added a custom column named "Comments" to that library. If the Comments field ever changes on any item, we want to receive an email letting us know what the comments were before the change was made, and what the comments are now. Here is how you can accomplish that using a workflow written in SharePoint Designer 2007.
Step 1: Create a Duplicate Document Library
The trick that were going to employ is to create a second copy of the document library. We'll let our workflow keep this library synchronized with the first library. This library will need to be set up exactly like the first one, including the custom "Comments" field. We'll name this library, "Documents2". Note: The Comments field on the Documents library MUST be a required field. If it isn't, the workflow will start as soon as new documents are uploaded, even before you enter in the original comments. By making this a required field, the workflow will wait on the Comments to be entered before it sends the synchronized copy to the Documents2 library.
Step 2: Begin Writing the Workflow
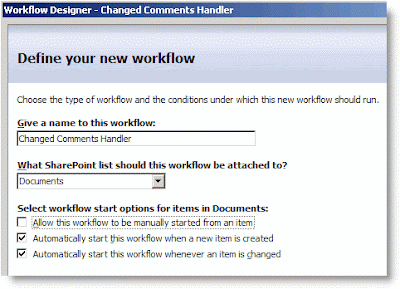
Open your site in SharePoint Designer 2007 and create a new workflow. Here are the options I chose:
Name: Changed Comments Handler
List: Documents
Start: Automatically start this workflow when a new item is created AND Automatically start this workflow whenever an item is changed.

The only thing that deserves an explanation are the Start Options. Remember that our workflow is responsible for keeping Documents and Documents2 synchronized. In order to do this, it will need to start whenever a new item is created and whenever an item is changed.
Step 3: In the Workflow, Add a Condition and Action to Handle New Documents
To see if a new document has been uploaded to Documents, we'll compare its name to the names of the documents in Documents2. If a document with that name ISN'T found in the Documents2 library, our workflow will send a copy there.
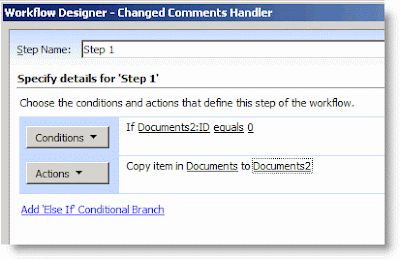
- Click on the Conditions button and choose Compare any data source.
- Click on the first value link and then the Display data binding [fx] button.
- In the Define Workflow Lookup dialog box, set the Source to Documents2:ID. Then, in the Find the List Item section, set the Field to Documents2:Name (for use in forms). For the Value, click on [fx]. In this second Define Workflow Lookup dialog box, choose Current Item: Name (for use in forms).
- Click OK, OK to close both dialog boxes. You will receive a warning that the lookup isn't guaranteed to return a single value. That's OK--it just means that Workflow Designer can't guarantee that there will only be one item in the list that has the same name. Just click Yes to continue.
- The first value returned will be the ID of the document in Documents2. If the document exists, this will be an integer greater than zero. If no document exists with the same name, this value will be zero. Click on the second value link and enter 0.
- To create the action for this condition, click on the Actions button and select Copy List Item.
- Click on the first this list link, choose Current Item, and click OK.
- Click on the second this list link, choose Documents2, and click OK.
Your workflow should like this:

Step 4: In the Workflow, Add a Condition to Handle Changed Comments
For this scenario, we don't care if anything else changes except the Comments field. We need to add a Condition to handle this scenario if it should occur.
- Click on Add 'Else If' Conditional Branch.
- Click on the Conditions button and choose Compare Documents field.
- Click on the first value link and choose Comments. This will refer to the Comments filed in the Documents library.
- Click on the second value link and and then [fx]. In the Define Workflow Lookup dialog box, set the Source to Documents2: Comments. This will allow us to compare the Comments field for the current item in the Documents library with the Comments field for the item with the same Name in the Documents2 library.
- In order to complete the Lookup, you need to set the options in the Find the List Item section. For Field, choose Documents2:Name (for use in forms).
- For Value, click on [fx]. In the new Define Workflow Lookup dialog box, choose Current Item, Name (for use in forms). This will cause the workflow to only use Comments field from an item in Documents2 that has the same Name as the document in Documents library.
- Click on OK, OK. Click Yes, again, when prompted about unique lookups.
- To finish this up, we only want the Action to fire when the two Comments fields aren't equal. Click on equals, and change it to not equals.
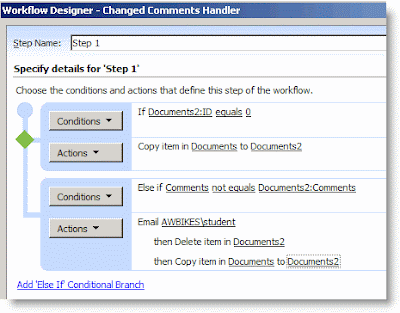
Now that you have finished writing the Condition, you are ready to write the Action. In this action, the workflow will send an email to a particular user that includes the previous comments and the new comments. Then the workflow will delete the item in Documents2 that has the same name and copy over the new item to Documents2.
- Click on Actions, and choose Send an Email.
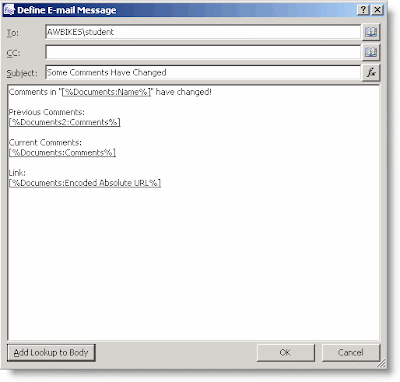
- Click on the this message link. A new dialog box will open for you to define the E-mail.
- Choose a recipient by clicking on the Select Users icon beside the To box.
- For the subject, I entered Some Comments Have Changed.
- In this dialog box, you can enter your own text and then use the Add Lookup to Body button to add other variables to your email. I added the name of the document, a link to the document, the Previous Comments, and the Current Comments. If you've followed along with the Lookups so far, you shouldn't have much trouble figuring out how to create the lookups in your email. When you are finished composing the email, click OK.
- Click on Actions, and choose Delete Item.
- Click on the this list link. In the Choose List Item dialog for the List select Documents2.
- In the Find the List Item section, for the Field, select Documents2:Name (for use in forms). For the Value, click on [fx], and choose Current Item: Name (for use in forms).
- Click on OK, OK. Click Yes, again, when prompted about unique lookups.
- To complete the Action section for this condition, click on the Actions button and select Copy List Item.
- Click on the first this list link, choose Current Item, and click OK.
- Click on the second this list link, choose Documents2, and click OK.


Step 6: Save the Workflow and Test It
To save the workflow, click the Finish button at the bottom of the Workflow Designer window. Once it compiles, you're ready to test it.
- Return to the Documents library in your browser and upload a document--for the Comments, just enter "Original Comments".
- Go to the Documents2 library. You should see a copy of your document there, along with the comments you entered.
- Return to the Documents library and choose Edit Properties for the document. Change the Comments to "Second Comments", and click OK.
- Return to the Documents2 library and you will see that the comments have updated there.
- Check your email. You should have received an email notification about the changes that included both the previous and current comments.

I realize that this isn't a "perfect" solution. But it does show some of the power of creating workflows with SharePoint Designer. The problems that I see with it initially are:
- It doesn't handle documents that have been deleted from the Documents library. If you delete a document there, the copy will remain in Documents2. SharePoint Designer workflows can only start manually, when something is created, or when something us updated. I currently don't see a way to start something when it is deleted because the workflow is attached to the item.
- There is no good way to keep users from manually making changes to items in Documents2. When the workflow performs its actions, it does so using the permission of the person that did the action that initiated it. If the user has permissions to Document2, then it is hard to hide it from them.
- It doesn't handle the case where the name of a document is changed. It would be possible to allow for this using some other unique identifier besides the document name though, perhaps something in another custom field.
- It doesn't handle the case where a document with the same name as an existing document is uploaded.
37 comments:
Excellent post. I appreciated the newbie level of help point of view.
How do you change the font on the sharepoint generated e-mail?
Thanks a lot for taking the time to put this together. Very very helpful - I've been in situations where I needed to implement a similar functionality and couldn't really work out how to achieve it. Creating a duplicate library may not be a perfect solution but as long as it does the job...
Thanks again.
Greg
Excellent post!!!
I'm trying to implement a similar solution however instead of copying the form (it's an InfoPath document library) is merely moving it from one document library to the other.
Any ideas?
Thanks for your help
Change the font, color etc. by formatting it with HTML attributes.
You can use HTML tags and attributes when you create your own emails in SharePoint Designer workflows. The emails that are automatically generated by SharePoint are not so easy to modify.
Very interesting. Ecerything worked if I created a new document in Library A, but bombed every time I tried uplaoding a document.
anonymous - That's interesting. Does your library require check-in or check-out? Does it have required metadata? Have you installed Service Pack 1 yet?
Excellent!
I have a problem and need help: In the document library,when i upload a file and apply a workflow for it.How can i do so that this uploaded file only seen by me and the approver.After it approved,others can see it.
Help!Thanks a lot!
Anonymous - On the Settings page of your Document Library click on Versioning Settings. Select the "Yes" option to require content approval for submitted items. In the "Draft Item Security" section on the same page, select the option for "Only users who can approve items (and the author of the item).
Greetings mr. Spears,
Thanks for a very clear article. My problem however is abit more complex, I would like to verify if a date changed (specific field in a form). This solution only seems to apply to Documents, could this work with Dates aswell (compare the date in the database with the current.date?
Mikey - I'm not exactly sure what you are asking, but you could do this on a custom list, calendar, or other list in much the same way you would on a Document Library. Both lists just have to be set up exactly the same way.
I am trying to use the CopyListItem action in SPDesigner in a workflow and it will copy some of the fields from the original list item, but not all of the fields. Is there something that would prohibit copying data that is from a choice list?
Anonymous - I've done some testing with this and the Copy List Item action works fine with Choice fields, but you have to make sure that the columns on both lists are configured exactly the same.
Here is a good blog post about it:
http://randomdust.com/blogs/ryan/archive/2007/08/27/details-for-copy-list-item-action.aspx
Excellent post.
But Document can't move to other Document Library.What can i do now.
please help me.
Mahendiran - You haven't given me enough information to help you. You've just told me that something isn't working without stating exaclty what you're trying to do and what you've tried to resolve it.
Hi
My work flow doesn't start automatically after I change any Item !
(I set my work flow to start automatically after any Item changed)
In your caveats you stated that you haven't found a way of preventing users from adding documents to the second document library. Would it not be possible to edit the permissions of the second library to prevent the users doing that?
James - That's a good idea, and it's the first thought that comes to mind for a solution. SharePoint Designer workflows run as the user that initiated the workflow. So, if users can't write to the document library, a workflow they initiate also can't write to that library either. :o)
I used a similar method to initiate a workflow when a field changed I found at http://office.microsoft.com/en-us/sharepointdesigner/HA102564191033.aspx. I've tried using this method for the comments field and discovered it doesn't work 'cos there isn't an initial value set to the comments field and so the workflow gets stuck in a loop. I presume this is what caused you to use the duplicate document library method?
Regarding your permissions issue what about setting all the field statuses to hidden in the content type of the document library? This would hide all the fields when a user tried to go into the document library and add a new document.
I'm using your workflow on the IT Helpdesk free Microsoft application template. I want to email the customer when a member of the IT department adds a comment to their service request.
I've mimicked your workflow step by step and it doesn't work. Is this because the new document in the library has to start with a initial comment for it to work. The service request doesn't require the person with the problem to input an initial comment as the comment field is purely designed for the IT staff to comment on their fix processes and keep the customer up to date.
The workflow just produces three documents into the second library. One for the initial document creation, the second for a change of status (the document is created with status=Initiated and changed to Engaged by the IT staff who picks it up) and the third for the test comment I entered.
Could you help me create a workflow that allows a blank comment field on document creation, then emails the customer when an IT staff member enters an initial comment.
milad.kh - Sorry, but I don't have enough information to help you. This would be difficult to diagnose without sitting at the server.
James Long - It was seveal months ago when I wrote this. I don't know why I chose one method over another. It may have been that one way just didn't occur to me. There is no single one RIGHT way to do any of this. The video you linked to is excellent, so thanks for adding that to the conversation. A major difference is my method allows you to check any field and not just a single field, even though I only use one field in the example.
You could use the hidden fields option, just keep in mind this is done through the Content Type.
I tell youat the beginning that the Comments field must be required in order for this to work properly.
As I think through this, I think you're going to need to have an initial value to avoid infinite looping. It may be possible, there just isn't anything coming to mind. Good luck!
The problem is that the comments field is multiple lines of text field and its not possible to have a default value to this field type.
Got any ideas how I could overcome this limitation? I think this calls for some lateral thinking to solve.
Further testing has revealed how limiting SharePoint workflows are!
I tried to setup another workflow using the method on the video posted previously for the comments field which compared the contents of a field called Previous Comments with the Current Comments and emailed the user if they were different.
Problem I discovered that this caused the workflows to bounce off each other. As the workflow updates a field in the list itself it causes the second workflow to start up because it sees that the list item has changed and runs its workflows. This causes a loop of one workflow starting and stopping when it finds nothing has changed which then kicks off the other workflow.
Do you know how I could solve this? I wondered whether I could combine the two workflows into one, so that the workflow checks whether one field has changed and processes that to produce an email and then checks another field to see if that has changed and processes an email if it has. Is this possible?
I want to keep the data in a table format using Sharepoint designer.
When i use the tags table
The data is not printing in a row.
If anyone has an idea please let me know..
James - Try adding a condition to step 1 of your workflow that compares the previous and current comment fields then if they are the same run the action "Stop Workflow".
I have Sharepoint Portal 2007 installed on a Windows 2003 server - everything's working...EXCEPT workflow. Was I supposed to install Windows Workflow Foundation?
When I go to the workflow gallery, I get an error: Failed to find the XML file at location '12\Template\Features\PublishingStapling\feature.xml'
Mary Beth - I'm not sure what you mean by SharePoint Portal 2007--there is no product by that name. You have either Windows SharePoint Services v.3 or Microsoft Office SharePoint Server 2007. I assume you mean the latter.
You should have had to install the .NET Framework 3.0 as part of the install process. That would have provided Windows Workflow Foundation.
Solving your problem may require more investigation and work than I can provide here. This comments area of our blog isn't the place for that, but you can contact us about helping with this using this form: http://moss.sharepointsolutions.com/SharePoint-Consulting/Pages/Request-Consulting-Information.aspx
In the meantime, here is a discussion board thread I found via search that may provide some ideas for you: http://social.msdn.microsoft.com/forums/en-US/sharepointgeneral/thread/844a3894-c284-4e47-94a1-32903feb043a
Hi Rick. This is a little after the fact but I believe there is a way to use your workflow without making Comments a required field.
I removed the required field status for Comments. Then following the If Documents2:ID equals 0 condition I inserted a Pause for Duration action prior to Copy item in Documents to Documents2.
It worked paused for one minute and then copied the document to the 2nd library. Then I changed the comment and the email was sent and Documents2 was updated.
Any gotchas I haven't considered here? Thanks for a great article.
JJ
I am trying to use your solution to create a workflow that will kick off a workflow when a backup directory has changed in a list. I have created the 2 documents as in your article. I followed the steps and have come up with a problem. When I modify list 1 it does look at list 2 and see it is different so it kicks off the workflow by sending an email. But then it deletes the entire server row out of list 2 and does not copy anything back in. Any suggestions would be appreciated.
I love this post, just awesome. It pointed me in the right direction, but, I need a little more. I am trying to do this for a list, and a specific field/column in this list. I can't quite get it to work though, so, I am hoping someone sees this and can help.
This is fascinating. I accomplished the exact same thing by choosing "Actions - Alert Me" - no workflow required!
There's an easier way to find out in a workflow whether a column has changed. You can create a new column in the document library called "Comments before".
A workflow that runs when an item changes, will compare Comments against "Comments before". If they are the same, it would stop the workflow. If they are different (meaning Comments changed), it does whatever it needs to do and also set "Comments Before" to the new value of Comments (to prevent an infinite loop).
This works very well. I've done it several times. This way, instead of creating another list, you just need another column!
Hi,
i have created two alerts one for the requester and the other to the support team who resolves the tickets.when the requestor gets the email the from address is not the address of the support team,it is something else.how do i change the from address of the alert which the requestor gets,so that it would be easy for the requestor when he clicks on reply buttom it would show the address of the support team.Please help me...
Navya - This isn't possible out-of-the-box. However, our Workflow Essentials product includes activities that allow you to change the FROM address for emails sent via SharePoint Designer workflows. You can get more information and download a free trial from:
http://sharepointsolutions.com/SharePoint-Add-ons/Products/Pages/WorkflowEssentials.aspx
This is great post, as I am in the same situation. I made though, a variation of the 'solution' as Ricky suggested there can be multiple solutions. I have created a List instead of a second Document Library. I created a column in the List to hold the Doc ID of the corresponding document which serves as the 'key' field. I also created a column for each field that I need to check for any change. This approach prevents me from having the same set of Forms in two locations.
HI, this seems to be something I could use however I need further clarification. I have a workflow setup to start when an item is changed and send an email to a specific group of people. Issue is that if 4 items are changed on a single line item, 4 emails are send out. I want to send only 1 email regardless of how many fields are changed. How can I do this?
miguel.gonzalez4@hp.com
Post a Comment