Wednesday, July 11, 2007

Overcoming Challenges in Modifying and Adding Page Content with JavaScript


If you've been wishing that more web parts gave you the option to apply XSLT styles, then the methods presented in this post may just be your ticket to the customization that you're seeking!It's not the same thing, but with some clever JavaScript coding, you can achieve similar results.

I'm a frequent user of Zap Reader—the popular, and free, web based speed reading program. There were already plugins for several blogs (WordPress, Blogger, and TypePad), but nothing for SharePoint blogs. I thought it would be nice to add a button to each blog post that allowed readers to quickly load the text into Zap Reader so they could speed read it.

Conventional wisdom would have said that this needed to be written in Visual Studio and then installed as a feature that could be activated or deactivated for each blog site. Some of the existing Zap Reader tools were already written in JavaScript, so I figured why not leverage this existing code base and write something that any Power User could easily add to their blog without having to go through all the IT Department red tape to get something extra installed. (I don't necessarily think all that red tape is a bad thing, I just figure why go through it if you don't have to.)

I started with the existing code for the Greasemonkey script that adds a "Zap Read This" button to each post in BlogLines—it worked essentially the way that I wanted this one to work: the page would load; the script would then rewrite each blog post on the page to include a "Zap Read This" button. It sounded good in concept, but I encountered a couple hurdles along the way. I'm hoping to save other JavaScript developers some trouble by documenting in this post how I overcame them. Note that many Greasemonkey scripts can be modified to work within a Content Editor web part to give all your users extra functionality on that page, regardless of the browser they are using. You may want to spend some time browsing http://www.UserScripts.org to get some inspiration, and code.

The DIVs for the blog posts don't have unique names.

Because I needed to extract the innerHTML for each post, modify it, and then write it back, I needed some way to consistently reference it. All the post DIVs did have the same "ms-PostBody" CSS class, however. To help with this, I found a nice JavaScript function called getElementsByClassName() by Jonathan Snook and Robert Nyman. Calling this function placed all the DIV objects with the "ms-PostBody" class in an array where I could work with them.

I couldn't add new FORM tags on the page.

If you've tried to add any code to a content editor web part that contained FORM tags, you got an error telling you, "FORM tags are not supported in the HTML specified in either the Content property or the Content Link property." At first I thought that would be no big deal since I was adding my tags dynamically using JavaScript to update the innerHTML of another DIV. When I tried this though, I got an "unknown runtime error" in the browser when my JavaScript ran.

I discovered that IE7 validates code that is written using the innerHTML property before it writes it, and if it is invalid markup, it will give you the "unknown runtime error". The reason that I was getting it was that almost the entire page was already wrapped in FORM tags (this is needed for all the cool out-of-the-box JavaScript functionality in SharePoint 2007) and you can't have one HTML form nested inside another one. That made sense. Since I couldn't add my form at each button, I decided to just utilize the existing form tags and have my script modify them when the button was clicked, and then change them back when the script was finished running.

You will find the code for the "Zap Read This" Button for SharePoint Blogs on the Zap Reader Tools page. The code is well documented to explain why I did some things the way I did. To use it, simply copy the code and paste it into a Content Editor web part on both the default.aspx and Lists/Posts/Post.aspx pages of your SharePoint Blog. You may want to customize the placement or look of the button, but this was written to give you just the basic functionality.

Let me know in the comments what you think!


Thursday, July 05, 2007

Changing the Number Of Blog Posts Per Page


When I posted about how to Select Multiple Categories for SharePoint Blog Posts, one reader noted in the comments that when you view items by category, it only lists 10 posts per page. This reader wanted to know how to increase the number of posts that are shown on a particular page.

Unfortunately, there isn't a quick and easy way to do this just from within a web browser. Our faithful friend, SharePoint Designer 2007 will give us the tools we need to change this, however.

First, click on one of the categories to go to the page that displays the posts for that category. The page should be at /Lists/Categories/Category.aspx. Now open this page for editing in SharePoint Designer 2007.

Once the page is open, change to code view. Then look for a section of code that looks like the following screenshot:


(Note: this screenshot was taken with Word Wrap enabled.)

You are looking for the section that is highlighted in the above screenshot.

You will see several other RowLimit sections with other numbers in them. You want to make sure you have this one.

Change the number "10" to however many blog posts you want to display on a page.

Once you've made your change, save the page and view it.

If you want to display more posts on the home page of your blog, you can do this same thing by editing default.aspx.

Adding JavaScript to a Content Editor Web Part to Run onLoad


Adding JavaScript to a page inside a Content Editor web part can be a great way to perform on-the-fly customizations to your SharePoint sites. This worked great in WSS v2 and SPS 2003. We started noticing that some of those scripts didn’t seem to work in WSS v3 and MOSS 2007, however, and it wasn’t because the names of objects and elements had changed.
For example, here is a JavaScript snippet that we had used to hide the “NEW!” icon on a page in WSS v2.
Note: In all code examples below, replace the square brackets around the SCRIPT tags with angle brackets. If I included the angle brackets, the browser tried to execute the code. :o(
[script language="JavaScript"]
var fields,i;
fields = document.getElementsByTagName('IMG');
for( i = 0; i < fields.length; i ++ ) {
  var imgsrc = fields[i].getAttribute('SRC');
  if(imgsrc.indexOf("new.gif") != -1) { 
   fields[i].style.visibility = "hidden";
  }
}
[/script]
When we added this to a Content Editor web part in a WSS v3 page, nothing seemed to happen. I added code to make it run on the onLoad event, and that didn’t work either. I did a little experimentation and discovered that if I added a short delay, even a delay of 1/1000 of a second, it worked fine. I placed the core code within a function and then called it with the setTimeout() method.
[script language="JavaScript"]
setTimeout(HideNewIcons,1);
function HideNewIcons(){
  var fields,i;
  fields = document.getElementsByTagName('IMG');
  for( i = 0; i < fields.length; i ++ ) {
    var imgsrc = fields[i].getAttribute('SRC');
    if(imgsrc.indexOf("new.gif") != -1) { 
     fields[i].style.visibility = "hidden";
    }
  }
}
[/script]
The problem occurs because most WSS v3 pages use a master page that contains the “body” element, and the page content code loads after the master page code. I didn’t know it at the time, but recently discovered (thanks to this article on the Microsoft SharePoint Products and Technologies Team Blog) that the SharePoint developers had given us a way to work around that issue—it’s the _spBodyOnLoadFunctionNames array. We can use JavaScript’s “push” method to load items into this array where they will run when the body’s onLoad event fires .
Here is what the JavaScript looks like with the setTimeout replaced with a line that pushes the function name “HideNewIcons” into the _spBodyOnLoadFunctionNames array.
[script language="JavaScript"]
_spBodyOnLoadFunctionNames.push("HideNewIcons");
function HideNewIcons(){
  var fields,i;
  fields = document.getElementsByTagName('IMG');
  for( i = 0; i < fields.length; i ++ ) {
    var imgsrc = fields[i].getAttribute('SRC');
    if(imgsrc.indexOf("new.gif") != -1) { 
     fields[i].style.visibility = "hidden";
    }
  }
}
[/script]
If you’ve been having trouble getting some of your legacy JavaScript scripts to run from within Content Editor web parts in WSS v3 or MOSS 2007 pages, give this technique a try, and let me know if it works for you.

Monday, July 02, 2007

I've been Presented with the 2007 Microsoft® MVP Award for Windows SharePoint Services


I received notification over the weekend that I’ve been presented with the 2007 Microsoft® MVP Award for Windows Server - Windows SharePoint Services. I wanted to thank the SharePoint community for this nomination and award. It is always nice to gain recognition from one's peers.

The team I work with at SharePoint Solutions is the best in the industry. These folks are hard-working people who care not only about success on a professional level, but also keep perspective on the importance of family and solid values. The SharePoint Solutions team has trained literally thousands of students on the intricacies of SharePoint, helped hundred of organizations implement SharePoint environments, and delivered a wide variety of valuable software add-ons for the SharePoint platform. The owners and members of SharePoint Solutions sincerely care about their customers and colleagues.

My wife Bekkey has been incredibly supportive and tolerant of me over the years. There have been far too many evenings during which I paid only half as much attention to her as I should have, because I was doing some kind of research or work on the computer.

It is because I am lucky enough to work with this great team, and because I have been blessed with such wonderful people in my life that I’ve been presented with the WSS MVP award.

It takes a village, and the village I live in is the best. Thanks everyone!

Thursday, June 28, 2007

Select Multiple Categories for SharePoint Blog Posts


As we teach users about SharePoint Blog sites in our Applying SharePoint 2007 - MOSS Core Features class and our SharePoint 2007 Jump-Start class, one question comes up quite often--"Can I select multiple categories?"

This is very easily accomplished. Remember that just about everything in SharePoint is just lists, and the blog posts and blog categories are no different.

By default, Blog posts only allow one category, which is displayed in a drop-down menu.


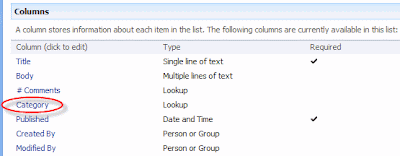
This should give you some clue about how to go about changing it. When you enter a new blog post, you are just adding a new item to a SharePoint list named "Posts", and "Category" is just one of the columns in that list--it is a Lookup column that looks up information from the Categories list.

To make the change, click on View All Site Content, and then click on Posts in the Lists section. When the default view for the Posts list loads, click on Settings, List Settings. This takes you to the page where you can edit all the properties for that particular list.

In the Columns section, click on Category.


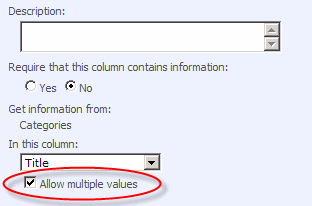
In the Additional Column Settings section, check the box beside Allow Multiple Values, and click the OK button.


When you create a new Blog Post, you will see that the control changes to allow you to select multiple categories.

Tuesday, June 26, 2007

SharePoint Information Workers Conference 2008


This past January we hosted the first-ever SharePoint Information Workers Conference in Orlando, Florida. Our team attends and speaks at numerous conferences each year, but, in general, they are all pretty technical in nature. So, after three years of teaching various training classes targeted at non-technical Information Workers, we decided it was high time that someone showed this group of SharePoint devotees a little love!

The conference in January was a great success. We had a sellout crowd, great speakers and top-notch exhibitors. We had many attendees from Europe and beyond.

We are definitely going to host this conference again in early 2008 (January or February). We've been working for several weeks to nail down a venue and final dates and hope to be able to announce the details by July 1.

If you would like to be notified via email when we have the location and dates for the 2008 conference finalized, go here and fill out the notification request form.

Monday, June 25, 2007

SharePoint Server 2007 VHD image


Microsoft has made available a SharePoint server 2007 vhd image at the following site:
http://www.microsoft.com/downloads/details.aspx?FamilyID=67f93dcb-ada8-4db5-a47b-df17e14b2c74&DisplayLang=en

Why does it matter to you? Well, you can use this virtual machine image to create a SharePoint Proof of Concept for your use case scenarios (among other uses).

Enjoy!

Friday, June 22, 2007

The Three-State Workflow - The Forgotten Out-Of-The-Box Workflow for Both WSS and MOSS


Many people believe that MOSS comes with only four out-of-the-box workflows (Approval, Collect Feedback, Collect Signatures, and Disposition Approval), and that WSS v3 doesn't come with any out-of-the-box workflows. In actuality, there is another work flow that is available out-of-the-box to both WSS v3 and MOSS—it's called the Three-state workflow.The reason that even many seasoned SharePoint professionals don't know much about the Three-state workflow is because the feature isn't activated by default—you will have to go into the Site collection features, and activate it.


Once you have activated the Three-state workflow feature, it will be available as a workflow template to all your lists, libraries, and content types.


The Three-state workflow allows you to track the status of an item between three states. This is very useful when tracking issues, project tasks, leads, or other similar items.
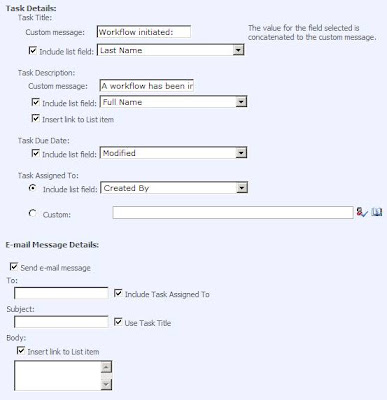
I won't bore you with details on how to use it; Microsoft has already done an excellent job of explaining how to use the Three-state Workflow. My mission here is just to let you know that it exists. I will leave you with one small screenshot though, just to whet your appetite. Look at all the options you have for the task and email details for each transition step.

Enjoy!

Tuesday, June 12, 2007

TechEd Buzz, SharePoint Governance and Site Provisioning Assistant


One of the most prevalent buzzwords floating around TechEd last week was “SharePoint Governance”. By Microsoft TechNet’s definition, the term SharePoint Governance is:

“… the set of roles, responsibilities, and processes that you put in place in an enterprise to guide the development and use of a solution based on SharePoint Products and Technologies.”

Is SharePoint Governance on your mind? If so, we believe that our new Site Provisioning Assistant product for SharePoint 2007 may help you to get a bit more sleep at night. Just as SharePoint MVP Shane Young and Microsoft’s Joel Oleson were quick to point out upon viewing a demonstration of SPA from our TechEd booth, Site Provisioning Assistant provides key features to assist in your SharePoint Governance strategy.

In a recent blog Post, Joel Oleson identifies a key component to SharePoint Governance as:

“… Self Service approach to deployment (bottoms up) - how can I keep Help desk from being a bottleneck to information worker productivity.”

We couldn’t agree more, and that is exactly why we developed the SPA add-on for WSS v3 and MOSS 2007. With Site Provisioning Assistant, you can automate the process of handling requests for new WSS v3.0 and MOSS 2007 sites. As a SharePoint administrator, SPA provides you with a solution to these key questions:
  • How can I enable our users to have the SharePoint sites they need in a timely manner, but maintain the integrity of our organization's taxonomy?
  • How can I give my users an easy to use, consistent interface for requesting new SharePoint sites?
  • How can I automate my organization's approval process for requesting new SharePoint sites?


For more information or to download an evaluation copy of SPA, visit the Site Provisioning Assistant Product home page.

Friday, June 01, 2007

Great new SharePoint book by Ted and Dan, see you at TechEd


Inside Microsoft Windows SharePoint Services 3.0

The SharePoint book that I have been waiting for the most has finally arrived. It seems like Clinton was still president when I ordered it :), but this book was well worth the wait. Back when I first heard that Ted Pattision and Daniel Larson were teaming up to write a SharePoint book, I got pretty excited. I knew these guys would have a knock-out book for SharePoint developers, and I'm happy to say I was right.

With this book, you will learn how to:
  • Build application pages and site pages
  • Develop and deploy reusable Web parts to enable customization and personalization
  • Exploit Windows SharePoint APIs to deploy Microsoft ASP.NET AJAX components
  • Use XML and Collaborative Application Markup Language (CAML) to create provisioning components
  • Design and implement custom document libraries
  • Use Windows Workflow Foundation to create applications that automate business process
  • Create Site Definitions to aggregate components and package them for deployment
  • Implement Code Access Security, Trust Levels, authentication, and authorization
Do yourself a huge favor, and go spend five minutes on Amazon ordering yourself a copy.

I hope that I get a chance to run into Ted and Daniel next week at TechEd in Orlando, to compliment them on the outstanding book. Are you going to TechEd? If so, please stop by our SharePoint Solutions booth and say hi. We'll be happy to demo our software add-ons for SharePoint, show you our training materials, talk about consulting, or just shoot the breeze. Our booth number in #254.