We'll be heading over to Las Vegas this weekend for the SharePoint Connections conference. Jeremy Luerkens and myself will be manning our SharePoint Solutions booth #626 in the exhibitor's hall, so please stop by.
If your organization is thinking about setting up a SharePoint-based extranet, our team has done more SharePoint extranet implementations than just about anyone. Come to booth #626 and talk with our expert team about our award-winning Extranet Collaboration Manager add-on product. Your users will be happy you did.
Additionally, we'll be launching the Beta 1 release of Alert Manager 2007 in conjunction with the conference, and we'll be happy to speak with you about this new product's rich feature set for managing all Alerts for all users in your SharePoint farm.
We also have an exciting new partner program for systems integrators who use our award-winning products to meet their customers' needs. We'll be happy to talk about the incentives program and its details with you.
I've heard rumor that we have a few iPods to give away, and I know we've got plenty of "Dude, where's my Alert?" tee shirts to toss around. The SharePoint Connections conference runs Monday November 5th through Thursday November 8th at the Mandalay Bay Resort in Las Vegas. We're looking forward to meeting with you.
Since 2004, a blog by members of the PremierPoint Solutions team - experts and pioneers on Microsoft SharePoint. (PremierPoint Solutions is formerly SharePoint Solutions.)
Wednesday, October 31, 2007
SharePoint Designer Workflows: How to Tell Which Fields Have Changed
If a workflow is set to start when an item is changed, you might think that it's impossible to determine exactly which field, or fields, have changed. This is because the workflow doesn't start until after the item has already changed. This can actually be accomplished though, using a SharePoint Designer workflow without too much pain.
The Scenario
For our scenario, we have a document library named "Documents". We have added a custom column named "Comments" to that library. If the Comments field ever changes on any item, we want to receive an email letting us know what the comments were before the change was made, and what the comments are now. Here is how you can accomplish that using a workflow written in SharePoint Designer 2007.
Step 1: Create a Duplicate Document Library
The trick that were going to employ is to create a second copy of the document library. We'll let our workflow keep this library synchronized with the first library. This library will need to be set up exactly like the first one, including the custom "Comments" field. We'll name this library, "Documents2". Note: The Comments field on the Documents library MUST be a required field. If it isn't, the workflow will start as soon as new documents are uploaded, even before you enter in the original comments. By making this a required field, the workflow will wait on the Comments to be entered before it sends the synchronized copy to the Documents2 library.
Step 2: Begin Writing the Workflow
Open your site in SharePoint Designer 2007 and create a new workflow. Here are the options I chose:
Name: Changed Comments Handler
List: Documents
Start: Automatically start this workflow when a new item is created AND Automatically start this workflow whenever an item is changed.
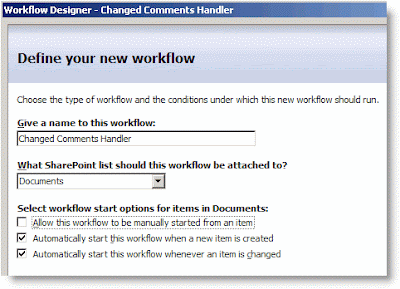
The only thing that deserves an explanation are the Start Options. Remember that our workflow is responsible for keeping Documents and Documents2 synchronized. In order to do this, it will need to start whenever a new item is created and whenever an item is changed.
Step 3: In the Workflow, Add a Condition and Action to Handle New Documents
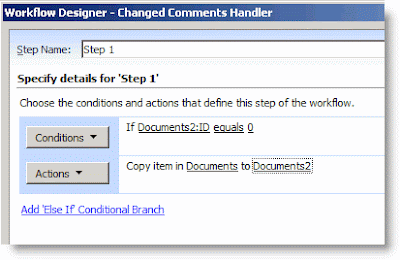
To see if a new document has been uploaded to Documents, we'll compare its name to the names of the documents in Documents2. If a document with that name ISN'T found in the Documents2 library, our workflow will send a copy there.
Your workflow should like this:
Step 4: In the Workflow, Add a Condition to Handle Changed Comments
For this scenario, we don't care if anything else changes except the Comments field. We need to add a Condition to handle this scenario if it should occur.
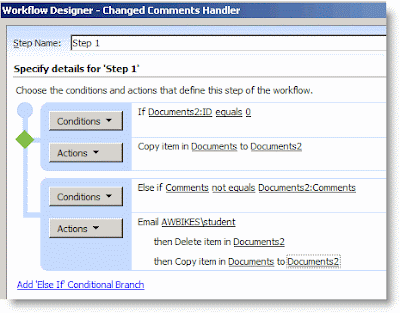
Now that you have finished writing the Condition, you are ready to write the Action. In this action, the workflow will send an email to a particular user that includes the previous comments and the new comments. Then the workflow will delete the item in Documents2 that has the same name and copy over the new item to Documents2.
Step 6: Save the Workflow and Test It
To save the workflow, click the Finish button at the bottom of the Workflow Designer window. Once it compiles, you're ready to test it.
I realize that this isn't a "perfect" solution. But it does show some of the power of creating workflows with SharePoint Designer. The problems that I see with it initially are:
The Scenario
For our scenario, we have a document library named "Documents". We have added a custom column named "Comments" to that library. If the Comments field ever changes on any item, we want to receive an email letting us know what the comments were before the change was made, and what the comments are now. Here is how you can accomplish that using a workflow written in SharePoint Designer 2007.
Step 1: Create a Duplicate Document Library
The trick that were going to employ is to create a second copy of the document library. We'll let our workflow keep this library synchronized with the first library. This library will need to be set up exactly like the first one, including the custom "Comments" field. We'll name this library, "Documents2". Note: The Comments field on the Documents library MUST be a required field. If it isn't, the workflow will start as soon as new documents are uploaded, even before you enter in the original comments. By making this a required field, the workflow will wait on the Comments to be entered before it sends the synchronized copy to the Documents2 library.
Step 2: Begin Writing the Workflow
Open your site in SharePoint Designer 2007 and create a new workflow. Here are the options I chose:
Name: Changed Comments Handler
List: Documents
Start: Automatically start this workflow when a new item is created AND Automatically start this workflow whenever an item is changed.

The only thing that deserves an explanation are the Start Options. Remember that our workflow is responsible for keeping Documents and Documents2 synchronized. In order to do this, it will need to start whenever a new item is created and whenever an item is changed.
Step 3: In the Workflow, Add a Condition and Action to Handle New Documents
To see if a new document has been uploaded to Documents, we'll compare its name to the names of the documents in Documents2. If a document with that name ISN'T found in the Documents2 library, our workflow will send a copy there.
- Click on the Conditions button and choose Compare any data source.
- Click on the first value link and then the Display data binding [fx] button.
- In the Define Workflow Lookup dialog box, set the Source to Documents2:ID. Then, in the Find the List Item section, set the Field to Documents2:Name (for use in forms). For the Value, click on [fx]. In this second Define Workflow Lookup dialog box, choose Current Item: Name (for use in forms).
- Click OK, OK to close both dialog boxes. You will receive a warning that the lookup isn't guaranteed to return a single value. That's OK--it just means that Workflow Designer can't guarantee that there will only be one item in the list that has the same name. Just click Yes to continue.
- The first value returned will be the ID of the document in Documents2. If the document exists, this will be an integer greater than zero. If no document exists with the same name, this value will be zero. Click on the second value link and enter 0.
- To create the action for this condition, click on the Actions button and select Copy List Item.
- Click on the first this list link, choose Current Item, and click OK.
- Click on the second this list link, choose Documents2, and click OK.
Your workflow should like this:

Step 4: In the Workflow, Add a Condition to Handle Changed Comments
For this scenario, we don't care if anything else changes except the Comments field. We need to add a Condition to handle this scenario if it should occur.
- Click on Add 'Else If' Conditional Branch.
- Click on the Conditions button and choose Compare Documents field.
- Click on the first value link and choose Comments. This will refer to the Comments filed in the Documents library.
- Click on the second value link and and then [fx]. In the Define Workflow Lookup dialog box, set the Source to Documents2: Comments. This will allow us to compare the Comments field for the current item in the Documents library with the Comments field for the item with the same Name in the Documents2 library.
- In order to complete the Lookup, you need to set the options in the Find the List Item section. For Field, choose Documents2:Name (for use in forms).
- For Value, click on [fx]. In the new Define Workflow Lookup dialog box, choose Current Item, Name (for use in forms). This will cause the workflow to only use Comments field from an item in Documents2 that has the same Name as the document in Documents library.
- Click on OK, OK. Click Yes, again, when prompted about unique lookups.
- To finish this up, we only want the Action to fire when the two Comments fields aren't equal. Click on equals, and change it to not equals.
Now that you have finished writing the Condition, you are ready to write the Action. In this action, the workflow will send an email to a particular user that includes the previous comments and the new comments. Then the workflow will delete the item in Documents2 that has the same name and copy over the new item to Documents2.
- Click on Actions, and choose Send an Email.
- Click on the this message link. A new dialog box will open for you to define the E-mail.
- Choose a recipient by clicking on the Select Users icon beside the To box.
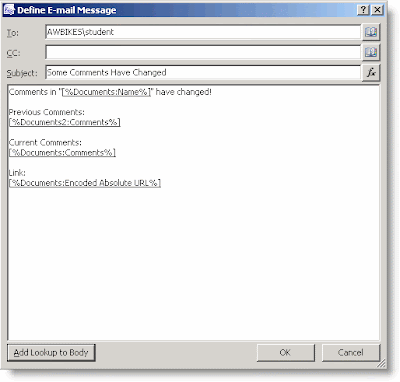
- For the subject, I entered Some Comments Have Changed.
- In this dialog box, you can enter your own text and then use the Add Lookup to Body button to add other variables to your email. I added the name of the document, a link to the document, the Previous Comments, and the Current Comments. If you've followed along with the Lookups so far, you shouldn't have much trouble figuring out how to create the lookups in your email. When you are finished composing the email, click OK.
- Click on Actions, and choose Delete Item.
- Click on the this list link. In the Choose List Item dialog for the List select Documents2.
- In the Find the List Item section, for the Field, select Documents2:Name (for use in forms). For the Value, click on [fx], and choose Current Item: Name (for use in forms).
- Click on OK, OK. Click Yes, again, when prompted about unique lookups.
- To complete the Action section for this condition, click on the Actions button and select Copy List Item.
- Click on the first this list link, choose Current Item, and click OK.
- Click on the second this list link, choose Documents2, and click OK.

Step 6: Save the Workflow and Test It
To save the workflow, click the Finish button at the bottom of the Workflow Designer window. Once it compiles, you're ready to test it.
- Return to the Documents library in your browser and upload a document--for the Comments, just enter "Original Comments".
- Go to the Documents2 library. You should see a copy of your document there, along with the comments you entered.
- Return to the Documents library and choose Edit Properties for the document. Change the Comments to "Second Comments", and click OK.
- Return to the Documents2 library and you will see that the comments have updated there.
- Check your email. You should have received an email notification about the changes that included both the previous and current comments.

I realize that this isn't a "perfect" solution. But it does show some of the power of creating workflows with SharePoint Designer. The problems that I see with it initially are:
- It doesn't handle documents that have been deleted from the Documents library. If you delete a document there, the copy will remain in Documents2. SharePoint Designer workflows can only start manually, when something is created, or when something us updated. I currently don't see a way to start something when it is deleted because the workflow is attached to the item.
- There is no good way to keep users from manually making changes to items in Documents2. When the workflow performs its actions, it does so using the permission of the person that did the action that initiated it. If the user has permissions to Document2, then it is hard to hide it from them.
- It doesn't handle the case where the name of a document is changed. It would be possible to allow for this using some other unique identifier besides the document name though, perhaps something in another custom field.
- It doesn't handle the case where a document with the same name as an existing document is uploaded.
Tuesday, October 30, 2007
Thursday, October 25, 2007
Sneak peak at Alert Manager 2007
Our software team has been busy these past months working on Alert Manager 2007.
Here's a sneak peak of some screen shots for the new product, which will be launched next month.
Stay tuned for more details.
Here's a sneak peak of some screen shots for the new product, which will be launched next month.
Stay tuned for more details.
Thursday, September 06, 2007
Make Selected Links in a Links List Open in a New Window
One of the questions that comes up frequently in our classes is, "How can I make some of my links in a Links List open in a new window?" I usually explain how I would accomplish this using JavaScript. I've answered this question so often now that I guess it's time to post the solution here on the blog.
When you add a link to your SharePoint navigation, or in a Summary Link Web Part, it gives you the option to, "Open link in new window." However, the standard Links list, doesn't give you this option. Many users seem to want it though.
The first part of my solution involves training your end-users to add something extra onto links that they want to open in a new window. I like to have them add. "#openinnewwindow". There is a two-fold reason for this. One, it's fairly easy for most users to remember once they've used it a couple times. Two, if the JavaScript code isn't in place, it doesn't cause any errors when a user clicks on the link--it will just open in the same window as normal (unless there is a named anchor on the target page named "openinnewwindow", which is highly unlikely. :) )
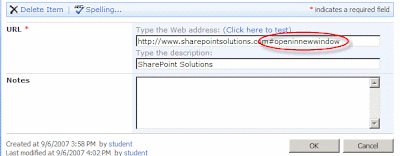
The second part of my solution is the JavaScript code that makes this work. Here is the code. It can be placed into the source of a Content Editor web part, or even added to your master page.
Note: In the code example below, replace the square brackets around the SCRIPT tags with angle brackets. If I included the angle brackets, the browser tried to execute the code. :(
[script language="JavaScript"]
//add an entry to the _spBodyOnLoadFunctionNames array
//so that our function will run on the pageLoad event
_spBodyOnLoadFunctionNames.push("rewriteLinks");
function rewriteLinks() {
//create an array to store all the anchor elements in
the page
var anchors = document.getElementsByTagName("a");
//loop through the array
for (var x=0; x<anchors.length; x++) {
//does this anchor element contain #openinnewwindow?
if (anchors[x].outerHTML.indexOf('#openinnewwindow')>0)
{
//store the HTML for this anchor element
oldText = anchors[x].outerHTML;
//rewrite the URL to remove our test text and add a target instead
newText = oldText.replace(/#openinnewwindow/,'" target="_blank');
//write the HTML back to the browser
anchors[x].outerHTML = newText;
}
}
}
[/script]
That's all you need to do make this work!
For all you code junkies, I think the comments in the code explain well enough what is going on. Let me know if you have questions.
When you add a link to your SharePoint navigation, or in a Summary Link Web Part, it gives you the option to, "Open link in new window." However, the standard Links list, doesn't give you this option. Many users seem to want it though.
The first part of my solution involves training your end-users to add something extra onto links that they want to open in a new window. I like to have them add. "#openinnewwindow". There is a two-fold reason for this. One, it's fairly easy for most users to remember once they've used it a couple times. Two, if the JavaScript code isn't in place, it doesn't cause any errors when a user clicks on the link--it will just open in the same window as normal (unless there is a named anchor on the target page named "openinnewwindow", which is highly unlikely. :) )

The second part of my solution is the JavaScript code that makes this work. Here is the code. It can be placed into the source of a Content Editor web part, or even added to your master page.
Note: In the code example below, replace the square brackets around the SCRIPT tags with angle brackets. If I included the angle brackets, the browser tried to execute the code. :(
[script language="JavaScript"]
//add an entry to the _spBodyOnLoadFunctionNames array
//so that our function will run on the pageLoad event
_spBodyOnLoadFunctionNames.push("rewriteLinks");
function rewriteLinks() {
//create an array to store all the anchor elements in
the page
var anchors = document.getElementsByTagName("a");
//loop through the array
for (var x=0; x<anchors.length; x++) {
//does this anchor element contain #openinnewwindow?
if (anchors[x].outerHTML.indexOf('#openinnewwindow')>0)
{
//store the HTML for this anchor element
oldText = anchors[x].outerHTML;
//rewrite the URL to remove our test text and add a target instead
newText = oldText.replace(/#openinnewwindow/,'" target="_blank');
//write the HTML back to the browser
anchors[x].outerHTML = newText;
}
}
}
[/script]
That's all you need to do make this work!
For all you code junkies, I think the comments in the code explain well enough what is going on. Let me know if you have questions.
Friday, August 24, 2007
Wednesday, August 15, 2007
Tuesday, August 07, 2007
Case Study: La-Z-Boy Collaborates with ExCM and SharePoint
La-Z-Boy has numerous business partners, vendors and licensees, and sharing information with organizations outside the company had become a major issue. Because SharePoint out-of-the-box only allows administrators to create user accounts and assign security roles, the IT department was faced with making business decisions about what information to make accessible to outside parties in critical areas such as intellectual property.
ExCM enabled La-Z-Boy to shift the burden from IT to line-of-business employees with expertise in specific areas who know what is appropriate to share with external parties, and let them manage the account-creation process.
ExCM enabled La-Z-Boy to shift the burden from IT to line-of-business employees with expertise in specific areas who know what is appropriate to share with external parties, and let them manage the account-creation process.
Friday, August 03, 2007
Take Custom Action Upon SharePoint FBA User Login
Many of our customers have use cases where by they would like to take a specific custom action when an FBA (forms based authentication) user logs in to their SharePoint Extranet. Some examples may be to update a back-end CRM system, or redirect the user to a specific page. It is actually fairly simple to implement this logic. The Visual Studio project and source code for this article can be downloaded by clicking the download link at the bottom of this page.
First under the 12 hive, open the C:\Program Files\Common Files\Microsoft Shared\web server extensions\12\TEMPLATE\LAYOUTS folder. Find the login.aspx file, and make a copy of it called CustomLogin.aspx. This will be our new user login page.
Next, open the web.config for your SharePoint application, find the <authentication/> element, and change it from:
Rename the automatically created Class1.cs to CustomLoginPage.cs. To save time and effort, the CustomLoginPage class will derive from Microsoft.SharePoint.ApplicationPages.LoginPage. Here's what the class should look like:
It should also be noted that the login control has three other events which may be salient to your particular use case.
First under the 12 hive, open the C:\Program Files\Common Files\Microsoft Shared\web server extensions\12\TEMPLATE\LAYOUTS folder. Find the login.aspx file, and make a copy of it called CustomLogin.aspx. This will be our new user login page.
Next, open the web.config for your SharePoint application, find the <authentication/> element, and change it from:
    <authentication mode="Forms">
      <forms loginUrl="/_layouts/login.aspx" />
    </authentication>
to:
    <authentication mode="Forms">
      <forms loginUrl="/_layouts/CustomLogin.aspx" />
    </authentication>
Now, create a new Class Library project in Visual Studio, or alternatively download my sample project from the link below. Your project will need references to Microsoft.SharePoint.dll, Microsoft.SharePoint.ApplicationPages.dll, and System.Web.
Rename the automatically created Class1.cs to CustomLoginPage.cs. To save time and effort, the CustomLoginPage class will derive from Microsoft.SharePoint.ApplicationPages.LoginPage. Here's what the class should look like:
using System;
using System.Collections.Generic;
using System.Text;
using System.Web;
using System.Web.Security;

namespace SPSolutions.Custom
{
    public class CustomLoginPage : Microsoft.SharePoint.ApplicationPages.LoginPage    {
        protected override void OnLoad(EventArgs e)
        {
            base.OnLoad(e);
            this.login.LoggedIn += new EventHandler(OnLoggedIn);
        }

        // Fires after user has sucessfully logged in        void OnLoggedIn(object sender, EventArgs e)
        {
            // Get the user            MembershipUser user = Membership.GetUser(this.login.UserName);

            if (user != null)
            {
                // Do something interesting such as redirect or update CRM            }
        }
    }
}
As you can see, it is a simple matter of subscribing to the base page's login control's LoggedIn event, and then taking action when that event fires. Inside the event handler, you can instantiate a MembershipUser object for the newly logged in user, and then do something interesting.
It should also be noted that the login control has three other events which may be salient to your particular use case.
- LoggingIn - Occurs when a user submits login information, but before authentication takes place.
- Authenticate - Occurs when a user is authentication takes place.
- LoggedIn - Occurs when a user logs in to the web site, and has been authenticated.
- LoginError - Occurs when a login error is detected.
<%@ Assembly Name="SPSolutions.Custom, Version=1.0.0.0, Culture=neutral, PublicKeyToken=e9db3057acd9c0f6"%>
<%@ Page Language="C#" Inherits="SPSolutions.Custom.CustomLoginPage" MasterPageFile="~/_layouts/simple.master"%>Finally, place the compiled assembly into the _app_bin folder of your SharePoint web application (e.g. C:\Inetpub\wwwroot\wss\VirtualDirectories\adventureworks.local.dev\_app_bin). Optionally, you could also place the assembly into the GAC.
Wednesday, August 01, 2007
Windows IT Pro Editor's Best of 2007 Award Goes to Extranet Collaboration Manager
Windows IT Pro magazine has given our Extranet Collaboration Manager product their Editor's Best of 2007 Award in the SharePoint category. ExCM is awarded on page 30 of this month's (August) Industry Excellence Awards edition of the magazine, which is also available online here.
During this process, Windows IT Pro magazine considered products for 13 different categories, including one category for Microsoft SharePoint. ExCM took first place for the SharePoint category, followed by Quest Software's (NASDAQ: QSFT) SharePoint Administrator product in second place, and Commvault's (NASDAQ: CVLT) Galaxy Backup and Recovery product in third place.
The editors of Windows IT Pro interviewed with members of our esteemed customer DraftFCB during their review. DraftFCB specializes in integrated marketing and advertising with an emphasis on branding, interactive, emerging media, multimedia, and database technology. Headquartered in Chicago and New York, the agency's network spans 180 offices in 110 countries serving clients such as Hewlett-Packard, Verizon, Computer Associates, Kellogg, and the United States Postal Service. The agency is led by chairman and CEO Howard Draft and is a subsidiary of Interpublic, the world's third-largest advertising conglomerate. DraftFCB is an early adopter of ExCM, and is actively using our product in their SharePoint 2007 Extranet.
No other free or commercial product on the market today offers the complete set of features available from ExCM. ExCM is platform certified by Microsoft and Veritest, and is used by both large and small companies from around the globe to enable their SharePoint 2007 based Extranets.
Subscribe to:
Posts (Atom)