Monday, January 21, 2008
Our Newest Class – Mission: Automation – SharePoint Workflow and InfoPath
For the past year, students have been telling me they wanted more information on how to use Workflow Designer in SharePoint Designer to write workflows to automate their business processes. I hear this after they use the out-of-the-box workflows in our MOSS Core Features class. When I wrote the MOSS Advanced Features class, I included an entire module dedicated to SharePoint Designer Workflows and InfoPath. Students continue to tell me that was great, but they still want more about workflows and InfoPath.
I'm excited to announce our newest class – Mission: Automation – SharePoint Workflow and InfoPath. For three exciting days, students will dig into InfoPath, Forms Services, and SharePoint Designer workflows.
On day one, you'll focus on learning the basics of InfoPath, Forms Services, and Workflow Designer in SharePoint Designer. On day two, you'll continue to build on those skills while you learn how to interact with external data, convert existing Word and Excel forms to InfoPath forms, work with digital signatures, and explore e-mail enabled forms in InfoPath and e-mail enabled lists in SharePoint. On the last day, you will continue to expand your knowledge by learning how to send your InfoPath form data to a database, how to work with forms on a mobile device, and how to work with an InfoPath form that contains code. Whew! I told you it was exciting!
If you want to make SharePoint far more than just a place to store information, this is the class for you. Register today! The class is geared towards Information Workers who want to learn how to use SharePoint to automate common business processes, Power Users, Enterprise Planners and Teams, Webmasters, Application Designers, Systems Analysts, Help-desk and end-user support professionals, Trainers, and IT Pros and Developers who are primarily interested in out-of-the-box functionality and features. Note: this course does not teach workflow development using Visual Studio and .NET.
Sunday, January 20, 2008
Checking for a NULL Date Field in SharePoint Designer Workflow
I was recently teaching an Advanced SharePoint class in Richardson, TX and a student was expressing his frustration over Microsoft's apparent oversight within the SharePoint Designer workflow wizard. One of the "IF" conditions is a simple testing of the value of a field…"If this equals that." He wanted to test a date field in SharePoint to see if it was empty or not. Problem is, when you select a field that is typed as DATE in SharePoint Designer, there is no test for the empty or null condition. You can see this in the first figure.

It occurred to me that we might be able to change the type of the field to a string and then be able to perform the comparison. I used the "Build Dynamic String" action.

I selected the End Date custom field on my Expense Statements list and stored it in a new variable that was typed as STRING.

The results of this were not exactly what I expected, however I was able to determine, through trial and error (sending the values in an email), that the conversion created a string that was filled with question marks (????). Therefore, if you simply test to see if the new string begins with a ?, you can successfully test for an empty date value.

Both my student and I were happy with the results. There may be other ways to do this (perhaps by testing if the value of the date is equal to the "beginning of time" date), but this certainly seems like an easy and foolproof method.
It occurred to me that we might be able to change the type of the field to a string and then be able to perform the comparison. I used the "Build Dynamic String" action.
I selected the End Date custom field on my Expense Statements list and stored it in a new variable that was typed as STRING.
The results of this were not exactly what I expected, however I was able to determine, through trial and error (sending the values in an email), that the conversion created a string that was filled with question marks (????). Therefore, if you simply test to see if the new string begins with a ?, you can successfully test for an empty date value.
Both my student and I were happy with the results. There may be other ways to do this (perhaps by testing if the value of the date is equal to the "beginning of time" date), but this certainly seems like an easy and foolproof method.
Sunday, January 13, 2008
VMs Disappearing from Microsoft Virtual Server
I know this isn't specifically a SharePoint issue, but...
Problem:
I use Microsoft Virtual Server to run all the SharePoint VMs that I use. At any given time, I may have 4-6 VMs on my notebook computer. Recently I ran into a problem where I kept losing my VMs that I set up on Virtual Server. Each time I came back into the Virtual Server administration web site (after restarting my notebook) my VMs that I set up from the last time would be missing. This caused me to have to go into the directory C:\Documents and Settings\All Users\Application Data\Microsoft\Virtual Server\Virtual Machines and delete all the VM shortcuts so I could re-add the VMs. Sometimes I had to create the VM again. However, all the Virtual Network shortcuts seemed to be unaffected. In all cases, the VHD and VMC files were fine...it was just the shortcuts that were causing the problem. I had been living with this problem for the last several months.
The Solution:
I felt like there was a problem somewhere in the permissions, so I finally started poking around. Sure enough, I found that there were some permissions that were not being correctly inherited from C:\Documents and Settings\All Users\Application Data\Microsoft\Virtual Server. I'm a little rusty on setting advanced permissions, so it took me a while to figure out how to make the correct permissions inherit to the Virtual Server sub-directories, but I finally figured it out. The Network Service didn’t have the appropriate permissions to the Virtual Machines directory. I finally found this MSDN documentation that details the DACLs for the Virtual Server directory. The NETWORK SERVICE entries in the following table were the permissions that were missing and not correctly being inherited by the sub-folders.
Whew! Finally got that fixed!
Problem:
I use Microsoft Virtual Server to run all the SharePoint VMs that I use. At any given time, I may have 4-6 VMs on my notebook computer. Recently I ran into a problem where I kept losing my VMs that I set up on Virtual Server. Each time I came back into the Virtual Server administration web site (after restarting my notebook) my VMs that I set up from the last time would be missing. This caused me to have to go into the directory C:\Documents and Settings\All Users\Application Data\Microsoft\Virtual Server\Virtual Machines and delete all the VM shortcuts so I could re-add the VMs. Sometimes I had to create the VM again. However, all the Virtual Network shortcuts seemed to be unaffected. In all cases, the VHD and VMC files were fine...it was just the shortcuts that were causing the problem. I had been living with this problem for the last several months.
The Solution:
I felt like there was a problem somewhere in the permissions, so I finally started poking around. Sure enough, I found that there were some permissions that were not being correctly inherited from C:\Documents and Settings\All Users\Application Data\Microsoft\Virtual Server. I'm a little rusty on setting advanced permissions, so it took me a while to figure out how to make the correct permissions inherit to the Virtual Server sub-directories, but I finally figured it out. The Network Service didn’t have the appropriate permissions to the Virtual Machines directory. I finally found this MSDN documentation that details the DACLs for the Virtual Server directory. The NETWORK SERVICE entries in the following table were the permissions that were missing and not correctly being inherited by the sub-folders.
| NETWORK SERVICE | Read & execute | This folder, subfolders, and files |
| NETWORK SERVICE | Create Files/Write Data Create Folders/Append Data | This folder only |
Whew! Finally got that fixed!
Tuesday, January 08, 2008
Presenting at Information Worker Conference 2008 (IWC08)
I'm looking forward to presenting at this year's upcoming Information Worker Conference. Along with SharePoint Solutions' president Jeff Cate and fellow software engineer Jeremy Luerkens, I'll be presenting a session on how we use SharePoint and Extranet Collaboration Manager to facilitate and automate our customer-facing business processes. Here is the title and description of our session:
Real-world case study: Collaborating with Customers on the Extranet with SharePoint
In January, 2007, SharePoint Solutions began using SharePoint 2007 to collaborate on the Extranet with every customer that attends one of its training classes. Each training class that is held receives its own WSS site that students can access during and after class to collaborate with fellow students and their instructors. The class extranet collaboration application has been a huge success with over 100 extranet sites created and being accessed securely over the Internet by over 1,500 customers. Come hear about the features of this solution, the approach that has been taken to ensure security, and the processes that have been established to quickly generate user accounts and uniform class sites. SharePoint Solutions' award-winning Extranet Collaboration Manager add-on, a big part of this solution, will also be highlighted by its designers, Tony Bierman and Jeremy Luerkens.
Thursday, January 03, 2008
Wednesday, November 14, 2007
Promote and recommend SharePoint content
So where do you currently go to look for pointers on various SharePoint content…? There are so many sites which claim to provide links to "good" SharePoint content that it's hard to keep count. Why not have a central place where users can recommend various content on functionality related to SharePoint Products and Technologies and then other users can recommend that content if they find it useful... Kinda like how digg.com currently does it.
Well, this concept is now a reality! SharePointPedia.com was launched a couple of weeks ago and it contains community driven content recommendations. It doesn't have that much content out there yet, but it's growing steadily. You can be a part of it as well and submit or recommend content. It's as simple as signing up on the site.
Well, this concept is now a reality! SharePointPedia.com was launched a couple of weeks ago and it contains community driven content recommendations. It doesn't have that much content out there yet, but it's growing steadily. You can be a part of it as well and submit or recommend content. It's as simple as signing up on the site.
Monday, November 12, 2007
SharePoint Information Worker Conference 2008
Early bird registration for the SharePoint Information Worker Conference 2008 is available until December 1.
$1,495 USD will get you full access to the world's only SharePoint Conference dedicated 100% to non-technical content.
This conference is the business and power-user's dream conference. We will have numerous topics on features and functionality and how to apply them to solve business problems. We will also have several in-depth case studies from companies that have been wringing every bit of value possible out of the SharePoint product line.
Our speakers will include experts from SharePoint Solutions, Microsoft, Project Performance Corporation, SharePoint MVPs and others from government and industry.
Finally, the conference venue, Gaylord Opryland Resort and Convention Hotel, is truly a one-of-a-kind place to visit. Inside the hotel are nine acres of lush, indoor gardens, shopping and restaurants. The multiple indoor atriums and gardens have year-round climate control so that it is enjoyable no matter what the weather is outside!
If you are interested in the business aspects and application of MOSS and WSS, don't miss this conference.
Wednesday, October 31, 2007
SharePoint Connections Booth #626 - See You There!
We'll be heading over to Las Vegas this weekend for the SharePoint Connections conference. Jeremy Luerkens and myself will be manning our SharePoint Solutions booth #626 in the exhibitor's hall, so please stop by.
If your organization is thinking about setting up a SharePoint-based extranet, our team has done more SharePoint extranet implementations than just about anyone. Come to booth #626 and talk with our expert team about our award-winning Extranet Collaboration Manager add-on product. Your users will be happy you did.
Additionally, we'll be launching the Beta 1 release of Alert Manager 2007 in conjunction with the conference, and we'll be happy to speak with you about this new product's rich feature set for managing all Alerts for all users in your SharePoint farm.
We also have an exciting new partner program for systems integrators who use our award-winning products to meet their customers' needs. We'll be happy to talk about the incentives program and its details with you.
I've heard rumor that we have a few iPods to give away, and I know we've got plenty of "Dude, where's my Alert?" tee shirts to toss around. The SharePoint Connections conference runs Monday November 5th through Thursday November 8th at the Mandalay Bay Resort in Las Vegas. We're looking forward to meeting with you.
SharePoint Designer Workflows: How to Tell Which Fields Have Changed
If a workflow is set to start when an item is changed, you might think that it's impossible to determine exactly which field, or fields, have changed. This is because the workflow doesn't start until after the item has already changed. This can actually be accomplished though, using a SharePoint Designer workflow without too much pain.
The Scenario
For our scenario, we have a document library named "Documents". We have added a custom column named "Comments" to that library. If the Comments field ever changes on any item, we want to receive an email letting us know what the comments were before the change was made, and what the comments are now. Here is how you can accomplish that using a workflow written in SharePoint Designer 2007.
Step 1: Create a Duplicate Document Library
The trick that were going to employ is to create a second copy of the document library. We'll let our workflow keep this library synchronized with the first library. This library will need to be set up exactly like the first one, including the custom "Comments" field. We'll name this library, "Documents2". Note: The Comments field on the Documents library MUST be a required field. If it isn't, the workflow will start as soon as new documents are uploaded, even before you enter in the original comments. By making this a required field, the workflow will wait on the Comments to be entered before it sends the synchronized copy to the Documents2 library.
Step 2: Begin Writing the Workflow
Open your site in SharePoint Designer 2007 and create a new workflow. Here are the options I chose:
Name: Changed Comments Handler
List: Documents
Start: Automatically start this workflow when a new item is created AND Automatically start this workflow whenever an item is changed.
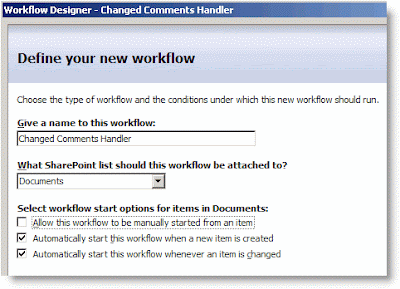
The only thing that deserves an explanation are the Start Options. Remember that our workflow is responsible for keeping Documents and Documents2 synchronized. In order to do this, it will need to start whenever a new item is created and whenever an item is changed.
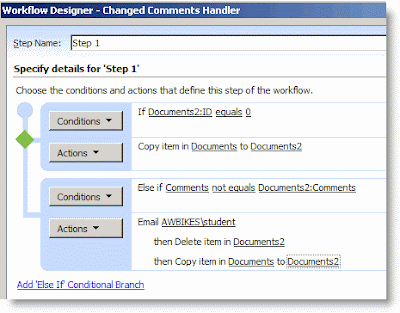
Step 3: In the Workflow, Add a Condition and Action to Handle New Documents
To see if a new document has been uploaded to Documents, we'll compare its name to the names of the documents in Documents2. If a document with that name ISN'T found in the Documents2 library, our workflow will send a copy there.
Your workflow should like this:

Step 4: In the Workflow, Add a Condition to Handle Changed Comments
For this scenario, we don't care if anything else changes except the Comments field. We need to add a Condition to handle this scenario if it should occur.
Now that you have finished writing the Condition, you are ready to write the Action. In this action, the workflow will send an email to a particular user that includes the previous comments and the new comments. Then the workflow will delete the item in Documents2 that has the same name and copy over the new item to Documents2.
Step 6: Save the Workflow and Test It
To save the workflow, click the Finish button at the bottom of the Workflow Designer window. Once it compiles, you're ready to test it.
I realize that this isn't a "perfect" solution. But it does show some of the power of creating workflows with SharePoint Designer. The problems that I see with it initially are:
The Scenario
For our scenario, we have a document library named "Documents". We have added a custom column named "Comments" to that library. If the Comments field ever changes on any item, we want to receive an email letting us know what the comments were before the change was made, and what the comments are now. Here is how you can accomplish that using a workflow written in SharePoint Designer 2007.
Step 1: Create a Duplicate Document Library
The trick that were going to employ is to create a second copy of the document library. We'll let our workflow keep this library synchronized with the first library. This library will need to be set up exactly like the first one, including the custom "Comments" field. We'll name this library, "Documents2". Note: The Comments field on the Documents library MUST be a required field. If it isn't, the workflow will start as soon as new documents are uploaded, even before you enter in the original comments. By making this a required field, the workflow will wait on the Comments to be entered before it sends the synchronized copy to the Documents2 library.
Step 2: Begin Writing the Workflow
Open your site in SharePoint Designer 2007 and create a new workflow. Here are the options I chose:
Name: Changed Comments Handler
List: Documents
Start: Automatically start this workflow when a new item is created AND Automatically start this workflow whenever an item is changed.

The only thing that deserves an explanation are the Start Options. Remember that our workflow is responsible for keeping Documents and Documents2 synchronized. In order to do this, it will need to start whenever a new item is created and whenever an item is changed.
Step 3: In the Workflow, Add a Condition and Action to Handle New Documents
To see if a new document has been uploaded to Documents, we'll compare its name to the names of the documents in Documents2. If a document with that name ISN'T found in the Documents2 library, our workflow will send a copy there.
- Click on the Conditions button and choose Compare any data source.
- Click on the first value link and then the Display data binding [fx] button.
- In the Define Workflow Lookup dialog box, set the Source to Documents2:ID. Then, in the Find the List Item section, set the Field to Documents2:Name (for use in forms). For the Value, click on [fx]. In this second Define Workflow Lookup dialog box, choose Current Item: Name (for use in forms).
- Click OK, OK to close both dialog boxes. You will receive a warning that the lookup isn't guaranteed to return a single value. That's OK--it just means that Workflow Designer can't guarantee that there will only be one item in the list that has the same name. Just click Yes to continue.
- The first value returned will be the ID of the document in Documents2. If the document exists, this will be an integer greater than zero. If no document exists with the same name, this value will be zero. Click on the second value link and enter 0.
- To create the action for this condition, click on the Actions button and select Copy List Item.
- Click on the first this list link, choose Current Item, and click OK.
- Click on the second this list link, choose Documents2, and click OK.
Your workflow should like this:

Step 4: In the Workflow, Add a Condition to Handle Changed Comments
For this scenario, we don't care if anything else changes except the Comments field. We need to add a Condition to handle this scenario if it should occur.
- Click on Add 'Else If' Conditional Branch.
- Click on the Conditions button and choose Compare Documents field.
- Click on the first value link and choose Comments. This will refer to the Comments filed in the Documents library.
- Click on the second value link and and then [fx]. In the Define Workflow Lookup dialog box, set the Source to Documents2: Comments. This will allow us to compare the Comments field for the current item in the Documents library with the Comments field for the item with the same Name in the Documents2 library.
- In order to complete the Lookup, you need to set the options in the Find the List Item section. For Field, choose Documents2:Name (for use in forms).
- For Value, click on [fx]. In the new Define Workflow Lookup dialog box, choose Current Item, Name (for use in forms). This will cause the workflow to only use Comments field from an item in Documents2 that has the same Name as the document in Documents library.
- Click on OK, OK. Click Yes, again, when prompted about unique lookups.
- To finish this up, we only want the Action to fire when the two Comments fields aren't equal. Click on equals, and change it to not equals.
Now that you have finished writing the Condition, you are ready to write the Action. In this action, the workflow will send an email to a particular user that includes the previous comments and the new comments. Then the workflow will delete the item in Documents2 that has the same name and copy over the new item to Documents2.
- Click on Actions, and choose Send an Email.
- Click on the this message link. A new dialog box will open for you to define the E-mail.
- Choose a recipient by clicking on the Select Users icon beside the To box.
- For the subject, I entered Some Comments Have Changed.
- In this dialog box, you can enter your own text and then use the Add Lookup to Body button to add other variables to your email. I added the name of the document, a link to the document, the Previous Comments, and the Current Comments. If you've followed along with the Lookups so far, you shouldn't have much trouble figuring out how to create the lookups in your email. When you are finished composing the email, click OK.
- Click on Actions, and choose Delete Item.
- Click on the this list link. In the Choose List Item dialog for the List select Documents2.
- In the Find the List Item section, for the Field, select Documents2:Name (for use in forms). For the Value, click on [fx], and choose Current Item: Name (for use in forms).
- Click on OK, OK. Click Yes, again, when prompted about unique lookups.
- To complete the Action section for this condition, click on the Actions button and select Copy List Item.
- Click on the first this list link, choose Current Item, and click OK.
- Click on the second this list link, choose Documents2, and click OK.


Step 6: Save the Workflow and Test It
To save the workflow, click the Finish button at the bottom of the Workflow Designer window. Once it compiles, you're ready to test it.
- Return to the Documents library in your browser and upload a document--for the Comments, just enter "Original Comments".
- Go to the Documents2 library. You should see a copy of your document there, along with the comments you entered.
- Return to the Documents library and choose Edit Properties for the document. Change the Comments to "Second Comments", and click OK.
- Return to the Documents2 library and you will see that the comments have updated there.
- Check your email. You should have received an email notification about the changes that included both the previous and current comments.


I realize that this isn't a "perfect" solution. But it does show some of the power of creating workflows with SharePoint Designer. The problems that I see with it initially are:
- It doesn't handle documents that have been deleted from the Documents library. If you delete a document there, the copy will remain in Documents2. SharePoint Designer workflows can only start manually, when something is created, or when something us updated. I currently don't see a way to start something when it is deleted because the workflow is attached to the item.
- There is no good way to keep users from manually making changes to items in Documents2. When the workflow performs its actions, it does so using the permission of the person that did the action that initiated it. If the user has permissions to Document2, then it is hard to hide it from them.
- It doesn't handle the case where the name of a document is changed. It would be possible to allow for this using some other unique identifier besides the document name though, perhaps something in another custom field.
- It doesn't handle the case where a document with the same name as an existing document is uploaded.
Subscribe to:
Posts (Atom)