Well, this concept is now a reality! SharePointPedia.com was launched a couple of weeks ago and it contains community driven content recommendations. It doesn't have that much content out there yet, but it's growing steadily. You can be a part of it as well and submit or recommend content. It's as simple as signing up on the site.
Since 2004, a blog by members of the PremierPoint Solutions team - experts and pioneers on Microsoft SharePoint. (PremierPoint Solutions is formerly SharePoint Solutions.)
Wednesday, November 14, 2007
Promote and recommend SharePoint content
Well, this concept is now a reality! SharePointPedia.com was launched a couple of weeks ago and it contains community driven content recommendations. It doesn't have that much content out there yet, but it's growing steadily. You can be a part of it as well and submit or recommend content. It's as simple as signing up on the site.
Monday, November 12, 2007
SharePoint Information Worker Conference 2008
Early bird registration for the SharePoint Information Worker Conference 2008 is available until December 1.
$1,495 USD will get you full access to the world's only SharePoint Conference dedicated 100% to non-technical content.
This conference is the business and power-user's dream conference. We will have numerous topics on features and functionality and how to apply them to solve business problems. We will also have several in-depth case studies from companies that have been wringing every bit of value possible out of the SharePoint product line.
Our speakers will include experts from SharePoint Solutions, Microsoft, Project Performance Corporation, SharePoint MVPs and others from government and industry.
Finally, the conference venue, Gaylord Opryland Resort and Convention Hotel, is truly a one-of-a-kind place to visit. Inside the hotel are nine acres of lush, indoor gardens, shopping and restaurants. The multiple indoor atriums and gardens have year-round climate control so that it is enjoyable no matter what the weather is outside!
If you are interested in the business aspects and application of MOSS and WSS, don't miss this conference.
Wednesday, October 31, 2007
SharePoint Connections Booth #626 - See You There!
If your organization is thinking about setting up a SharePoint-based extranet, our team has done more SharePoint extranet implementations than just about anyone. Come to booth #626 and talk with our expert team about our award-winning Extranet Collaboration Manager add-on product. Your users will be happy you did.
Additionally, we'll be launching the Beta 1 release of Alert Manager 2007 in conjunction with the conference, and we'll be happy to speak with you about this new product's rich feature set for managing all Alerts for all users in your SharePoint farm.
We also have an exciting new partner program for systems integrators who use our award-winning products to meet their customers' needs. We'll be happy to talk about the incentives program and its details with you.
I've heard rumor that we have a few iPods to give away, and I know we've got plenty of "Dude, where's my Alert?" tee shirts to toss around. The SharePoint Connections conference runs Monday November 5th through Thursday November 8th at the Mandalay Bay Resort in Las Vegas. We're looking forward to meeting with you.
SharePoint Designer Workflows: How to Tell Which Fields Have Changed
The Scenario
For our scenario, we have a document library named "Documents". We have added a custom column named "Comments" to that library. If the Comments field ever changes on any item, we want to receive an email letting us know what the comments were before the change was made, and what the comments are now. Here is how you can accomplish that using a workflow written in SharePoint Designer 2007.
Step 1: Create a Duplicate Document Library
The trick that were going to employ is to create a second copy of the document library. We'll let our workflow keep this library synchronized with the first library. This library will need to be set up exactly like the first one, including the custom "Comments" field. We'll name this library, "Documents2". Note: The Comments field on the Documents library MUST be a required field. If it isn't, the workflow will start as soon as new documents are uploaded, even before you enter in the original comments. By making this a required field, the workflow will wait on the Comments to be entered before it sends the synchronized copy to the Documents2 library.
Step 2: Begin Writing the Workflow
Open your site in SharePoint Designer 2007 and create a new workflow. Here are the options I chose:
Name: Changed Comments Handler
List: Documents
Start: Automatically start this workflow when a new item is created AND Automatically start this workflow whenever an item is changed.
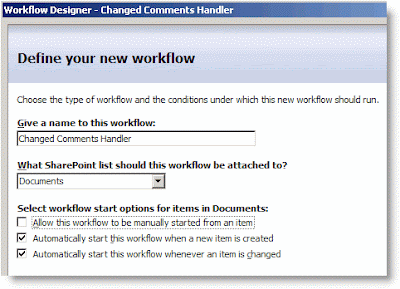
The only thing that deserves an explanation are the Start Options. Remember that our workflow is responsible for keeping Documents and Documents2 synchronized. In order to do this, it will need to start whenever a new item is created and whenever an item is changed.
Step 3: In the Workflow, Add a Condition and Action to Handle New Documents
To see if a new document has been uploaded to Documents, we'll compare its name to the names of the documents in Documents2. If a document with that name ISN'T found in the Documents2 library, our workflow will send a copy there.
- Click on the Conditions button and choose Compare any data source.
- Click on the first value link and then the Display data binding [fx] button.
- In the Define Workflow Lookup dialog box, set the Source to Documents2:ID. Then, in the Find the List Item section, set the Field to Documents2:Name (for use in forms). For the Value, click on [fx]. In this second Define Workflow Lookup dialog box, choose Current Item: Name (for use in forms).
- Click OK, OK to close both dialog boxes. You will receive a warning that the lookup isn't guaranteed to return a single value. That's OK--it just means that Workflow Designer can't guarantee that there will only be one item in the list that has the same name. Just click Yes to continue.
- The first value returned will be the ID of the document in Documents2. If the document exists, this will be an integer greater than zero. If no document exists with the same name, this value will be zero. Click on the second value link and enter 0.
- To create the action for this condition, click on the Actions button and select Copy List Item.
- Click on the first this list link, choose Current Item, and click OK.
- Click on the second this list link, choose Documents2, and click OK.
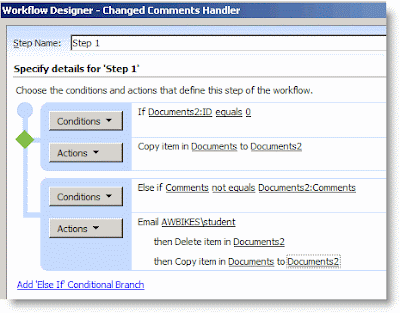
Your workflow should like this:
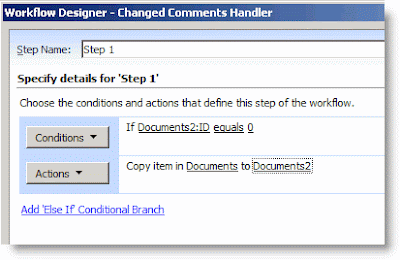
Step 4: In the Workflow, Add a Condition to Handle Changed Comments
For this scenario, we don't care if anything else changes except the Comments field. We need to add a Condition to handle this scenario if it should occur.
- Click on Add 'Else If' Conditional Branch.
- Click on the Conditions button and choose Compare Documents field.
- Click on the first value link and choose Comments. This will refer to the Comments filed in the Documents library.
- Click on the second value link and and then [fx]. In the Define Workflow Lookup dialog box, set the Source to Documents2: Comments. This will allow us to compare the Comments field for the current item in the Documents library with the Comments field for the item with the same Name in the Documents2 library.
- In order to complete the Lookup, you need to set the options in the Find the List Item section. For Field, choose Documents2:Name (for use in forms).
- For Value, click on [fx]. In the new Define Workflow Lookup dialog box, choose Current Item, Name (for use in forms). This will cause the workflow to only use Comments field from an item in Documents2 that has the same Name as the document in Documents library.
- Click on OK, OK. Click Yes, again, when prompted about unique lookups.
- To finish this up, we only want the Action to fire when the two Comments fields aren't equal. Click on equals, and change it to not equals.
Now that you have finished writing the Condition, you are ready to write the Action. In this action, the workflow will send an email to a particular user that includes the previous comments and the new comments. Then the workflow will delete the item in Documents2 that has the same name and copy over the new item to Documents2.
- Click on Actions, and choose Send an Email.
- Click on the this message link. A new dialog box will open for you to define the E-mail.
- Choose a recipient by clicking on the Select Users icon beside the To box.
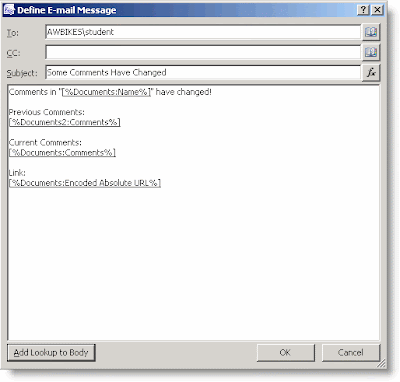
- For the subject, I entered Some Comments Have Changed.
- In this dialog box, you can enter your own text and then use the Add Lookup to Body button to add other variables to your email. I added the name of the document, a link to the document, the Previous Comments, and the Current Comments. If you've followed along with the Lookups so far, you shouldn't have much trouble figuring out how to create the lookups in your email. When you are finished composing the email, click OK.
- Click on Actions, and choose Delete Item.
- Click on the this list link. In the Choose List Item dialog for the List select Documents2.
- In the Find the List Item section, for the Field, select Documents2:Name (for use in forms). For the Value, click on [fx], and choose Current Item: Name (for use in forms).
- Click on OK, OK. Click Yes, again, when prompted about unique lookups.
- To complete the Action section for this condition, click on the Actions button and select Copy List Item.
- Click on the first this list link, choose Current Item, and click OK.
- Click on the second this list link, choose Documents2, and click OK.
Step 6: Save the Workflow and Test It
To save the workflow, click the Finish button at the bottom of the Workflow Designer window. Once it compiles, you're ready to test it.
- Return to the Documents library in your browser and upload a document--for the Comments, just enter "Original Comments".
- Go to the Documents2 library. You should see a copy of your document there, along with the comments you entered.
- Return to the Documents library and choose Edit Properties for the document. Change the Comments to "Second Comments", and click OK.
- Return to the Documents2 library and you will see that the comments have updated there.
- Check your email. You should have received an email notification about the changes that included both the previous and current comments.

I realize that this isn't a "perfect" solution. But it does show some of the power of creating workflows with SharePoint Designer. The problems that I see with it initially are:
- It doesn't handle documents that have been deleted from the Documents library. If you delete a document there, the copy will remain in Documents2. SharePoint Designer workflows can only start manually, when something is created, or when something us updated. I currently don't see a way to start something when it is deleted because the workflow is attached to the item.
- There is no good way to keep users from manually making changes to items in Documents2. When the workflow performs its actions, it does so using the permission of the person that did the action that initiated it. If the user has permissions to Document2, then it is hard to hide it from them.
- It doesn't handle the case where the name of a document is changed. It would be possible to allow for this using some other unique identifier besides the document name though, perhaps something in another custom field.
- It doesn't handle the case where a document with the same name as an existing document is uploaded.
Tuesday, October 30, 2007
Thursday, October 25, 2007
Sneak peak at Alert Manager 2007
Here's a sneak peak of some screen shots for the new product, which will be launched next month.
Stay tuned for more details.
Thursday, September 06, 2007
Make Selected Links in a Links List Open in a New Window
When you add a link to your SharePoint navigation, or in a Summary Link Web Part, it gives you the option to, "Open link in new window." However, the standard Links list, doesn't give you this option. Many users seem to want it though.
The first part of my solution involves training your end-users to add something extra onto links that they want to open in a new window. I like to have them add. "#openinnewwindow". There is a two-fold reason for this. One, it's fairly easy for most users to remember once they've used it a couple times. Two, if the JavaScript code isn't in place, it doesn't cause any errors when a user clicks on the link--it will just open in the same window as normal (unless there is a named anchor on the target page named "openinnewwindow", which is highly unlikely. :) )
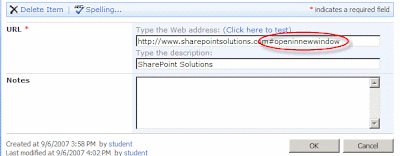
The second part of my solution is the JavaScript code that makes this work. Here is the code. It can be placed into the source of a Content Editor web part, or even added to your master page.
Note: In the code example below, replace the square brackets around the SCRIPT tags with angle brackets. If I included the angle brackets, the browser tried to execute the code. :(
[script language="JavaScript"]
//add an entry to the _spBodyOnLoadFunctionNames array
//so that our function will run on the pageLoad event
_spBodyOnLoadFunctionNames.push("rewriteLinks");
function rewriteLinks() {
//create an array to store all the anchor elements in
the page
var anchors = document.getElementsByTagName("a");
//loop through the array
for (var x=0; x<anchors.length; x++) {
//does this anchor element contain #openinnewwindow?
if (anchors[x].outerHTML.indexOf('#openinnewwindow')>0)
{
//store the HTML for this anchor element
oldText = anchors[x].outerHTML;
//rewrite the URL to remove our test text and add a target instead
newText = oldText.replace(/#openinnewwindow/,'" target="_blank');
//write the HTML back to the browser
anchors[x].outerHTML = newText;
}
}
}
[/script]
That's all you need to do make this work!
For all you code junkies, I think the comments in the code explain well enough what is going on. Let me know if you have questions.
Friday, August 24, 2007
Wednesday, August 15, 2007
Tuesday, August 07, 2007
Case Study: La-Z-Boy Collaborates with ExCM and SharePoint
ExCM enabled La-Z-Boy to shift the burden from IT to line-of-business employees with expertise in specific areas who know what is appropriate to share with external parties, and let them manage the account-creation process.
Friday, August 03, 2007
Take Custom Action Upon SharePoint FBA User Login
First under the 12 hive, open the C:\Program Files\Common Files\Microsoft Shared\web server extensions\12\TEMPLATE\LAYOUTS folder. Find the login.aspx file, and make a copy of it called CustomLogin.aspx. This will be our new user login page.
Next, open the web.config for your SharePoint application, find the <authentication/> element, and change it from:
    <authentication mode="Forms">
      <forms loginUrl="/_layouts/login.aspx" />
    </authentication>
to:
    <authentication mode="Forms">
      <forms loginUrl="/_layouts/CustomLogin.aspx" />
    </authentication>
Now, create a new Class Library project in Visual Studio, or alternatively download my sample project from the link below. Your project will need references to Microsoft.SharePoint.dll, Microsoft.SharePoint.ApplicationPages.dll, and System.Web.
Rename the automatically created Class1.cs to CustomLoginPage.cs. To save time and effort, the CustomLoginPage class will derive from Microsoft.SharePoint.ApplicationPages.LoginPage. Here's what the class should look like:
using System;
using System.Collections.Generic;
using System.Text;
using System.Web;
using System.Web.Security;

namespace SPSolutions.Custom
{
    public class CustomLoginPage : Microsoft.SharePoint.ApplicationPages.LoginPage    {
        protected override void OnLoad(EventArgs e)
        {
            base.OnLoad(e);
            this.login.LoggedIn += new EventHandler(OnLoggedIn);
        }

        // Fires after user has sucessfully logged in        void OnLoggedIn(object sender, EventArgs e)
        {
            // Get the user            MembershipUser user = Membership.GetUser(this.login.UserName);

            if (user != null)
            {
                // Do something interesting such as redirect or update CRM            }
        }
    }
}
As you can see, it is a simple matter of subscribing to the base page's login control's LoggedIn event, and then taking action when that event fires. Inside the event handler, you can instantiate a MembershipUser object for the newly logged in user, and then do something interesting.
It should also be noted that the login control has three other events which may be salient to your particular use case.
- LoggingIn - Occurs when a user submits login information, but before authentication takes place.
- Authenticate - Occurs when a user is authentication takes place.
- LoggedIn - Occurs when a user logs in to the web site, and has been authenticated.
- LoginError - Occurs when a login error is detected.
<%@ Assembly Name="SPSolutions.Custom, Version=1.0.0.0, Culture=neutral, PublicKeyToken=e9db3057acd9c0f6"%>
<%@ Page Language="C#" Inherits="SPSolutions.Custom.CustomLoginPage" MasterPageFile="~/_layouts/simple.master"%>Finally, place the compiled assembly into the _app_bin folder of your SharePoint web application (e.g. C:\Inetpub\wwwroot\wss\VirtualDirectories\adventureworks.local.dev\_app_bin). Optionally, you could also place the assembly into the GAC.
Wednesday, August 01, 2007
Windows IT Pro Editor's Best of 2007 Award Goes to Extranet Collaboration Manager
During this process, Windows IT Pro magazine considered products for 13 different categories, including one category for Microsoft SharePoint. ExCM took first place for the SharePoint category, followed by Quest Software's (NASDAQ: QSFT) SharePoint Administrator product in second place, and Commvault's (NASDAQ: CVLT) Galaxy Backup and Recovery product in third place.
The editors of Windows IT Pro interviewed with members of our esteemed customer DraftFCB during their review. DraftFCB specializes in integrated marketing and advertising with an emphasis on branding, interactive, emerging media, multimedia, and database technology. Headquartered in Chicago and New York, the agency's network spans 180 offices in 110 countries serving clients such as Hewlett-Packard, Verizon, Computer Associates, Kellogg, and the United States Postal Service. The agency is led by chairman and CEO Howard Draft and is a subsidiary of Interpublic, the world's third-largest advertising conglomerate. DraftFCB is an early adopter of ExCM, and is actively using our product in their SharePoint 2007 Extranet.
No other free or commercial product on the market today offers the complete set of features available from ExCM. ExCM is platform certified by Microsoft and Veritest, and is used by both large and small companies from around the globe to enable their SharePoint 2007 based Extranets.
Thursday, July 19, 2007
Keyboard Shortcuts for SharePoint Calendars
Here are the keyboard shortcuts for SharePoint Calendar views:
ALT + [ - Previous day, week, or month in a view
ALT + ] - Next day, week, or month in a view
ALT + X - Expand all
ALT + P - Collapse all
ALT + . - Switch to Day view
ALT + - - Switch to Week view
ALT + = - Switch to Month view
Hitting these keys in Internet Explorer will select the link--you will need to hit the ENTER key afterwards to activate the link.
Microsoft has also provided a complete list of SharePoint Keyboard shortcuts.
UforB: New European Reseller for SharePoint Solutions Software
Utilities for Business provides solutions for:
- SharePoint Web Parts
- Internet solutions
- Business Intelligence
- Interactive visual reports
- Management Information Systems
Thursday, July 12, 2007
Creating Workflows for Windows Sharepoint Services and MOSS2007 - a Step by Step Tutorial by Serge Luca.
Serge's article is well-written and well-illustrated. It looks like three of twenty articles have been published so far, but clearly his complete article will be an authoritative guide worth bookmarking for future reference.
Wednesday, July 11, 2007
Overcoming Challenges in Modifying and Adding Page Content with JavaScript
If you've been wishing that more web parts gave you the option to apply XSLT styles, then the methods presented in this post may just be your ticket to the customization that you're seeking!It's not the same thing, but with some clever JavaScript coding, you can achieve similar results.
I'm a frequent user of Zap Reader—the popular, and free, web based speed reading program. There were already plugins for several blogs (WordPress, Blogger, and TypePad), but nothing for SharePoint blogs. I thought it would be nice to add a button to each blog post that allowed readers to quickly load the text into Zap Reader so they could speed read it.
Conventional wisdom would have said that this needed to be written in Visual Studio and then installed as a feature that could be activated or deactivated for each blog site. Some of the existing Zap Reader tools were already written in JavaScript, so I figured why not leverage this existing code base and write something that any Power User could easily add to their blog without having to go through all the IT Department red tape to get something extra installed. (I don't necessarily think all that red tape is a bad thing, I just figure why go through it if you don't have to.)
I started with the existing code for the Greasemonkey script that adds a "Zap Read This" button to each post in BlogLines—it worked essentially the way that I wanted this one to work: the page would load; the script would then rewrite each blog post on the page to include a "Zap Read This" button. It sounded good in concept, but I encountered a couple hurdles along the way. I'm hoping to save other JavaScript developers some trouble by documenting in this post how I overcame them. Note that many Greasemonkey scripts can be modified to work within a Content Editor web part to give all your users extra functionality on that page, regardless of the browser they are using. You may want to spend some time browsing http://www.UserScripts.org to get some inspiration, and code.
The DIVs for the blog posts don't have unique names.
Because I needed to extract the innerHTML for each post, modify it, and then write it back, I needed some way to consistently reference it. All the post DIVs did have the same "ms-PostBody" CSS class, however. To help with this, I found a nice JavaScript function called getElementsByClassName() by Jonathan Snook and Robert Nyman. Calling this function placed all the DIV objects with the "ms-PostBody" class in an array where I could work with them.
I couldn't add new FORM tags on the page.
If you've tried to add any code to a content editor web part that contained FORM tags, you got an error telling you, "FORM tags are not supported in the HTML specified in either the Content property or the Content Link property." At first I thought that would be no big deal since I was adding my tags dynamically using JavaScript to update the innerHTML of another DIV. When I tried this though, I got an "unknown runtime error" in the browser when my JavaScript ran.
I discovered that IE7 validates code that is written using the innerHTML property before it writes it, and if it is invalid markup, it will give you the "unknown runtime error". The reason that I was getting it was that almost the entire page was already wrapped in FORM tags (this is needed for all the cool out-of-the-box JavaScript functionality in SharePoint 2007) and you can't have one HTML form nested inside another one. That made sense. Since I couldn't add my form at each button, I decided to just utilize the existing form tags and have my script modify them when the button was clicked, and then change them back when the script was finished running.
You will find the code for the "Zap Read This" Button for SharePoint Blogs on the Zap Reader Tools page. The code is well documented to explain why I did some things the way I did. To use it, simply copy the code and paste it into a Content Editor web part on both the default.aspx and Lists/Posts/Post.aspx pages of your SharePoint Blog. You may want to customize the placement or look of the button, but this was written to give you just the basic functionality.
Let me know in the comments what you think!
Thursday, July 05, 2007
Changing the Number Of Blog Posts Per Page
Unfortunately, there isn't a quick and easy way to do this just from within a web browser. Our faithful friend, SharePoint Designer 2007 will give us the tools we need to change this, however.
First, click on one of the categories to go to the page that displays the posts for that category. The page should be at /Lists/Categories/Category.aspx. Now open this page for editing in SharePoint Designer 2007.
Once the page is open, change to code view. Then look for a section of code that looks like the following screenshot:

(Note: this screenshot was taken with Word Wrap enabled.)
You are looking for the section that is highlighted in the above screenshot.
You will see several other RowLimit sections with other numbers in them. You want to make sure you have this one.
Change the number "10" to however many blog posts you want to display on a page.
Once you've made your change, save the page and view it.
If you want to display more posts on the home page of your blog, you can do this same thing by editing default.aspx.
Adding JavaScript to a Content Editor Web Part to Run onLoad
For example, here is a JavaScript snippet that we had used to hide the “NEW!” icon on a page in WSS v2.
Note: In all code examples below, replace the square brackets around the SCRIPT tags with angle brackets. If I included the angle brackets, the browser tried to execute the code. :o(
[script language="JavaScript"]
var fields,i;
fields = document.getElementsByTagName('IMG');
for( i = 0; i < fields.length; i ++ ) {
  var imgsrc = fields[i].getAttribute('SRC');
  if(imgsrc.indexOf("new.gif") != -1) {
   fields[i].style.visibility = "hidden";
  }
}
[/script]
When we added this to a Content Editor web part in a WSS v3 page, nothing seemed to happen. I added code to make it run on the onLoad event, and that didn’t work either. I did a little experimentation and discovered that if I added a short delay, even a delay of 1/1000 of a second, it worked fine. I placed the core code within a function and then called it with the setTimeout() method.
[script language="JavaScript"]
setTimeout(HideNewIcons,1);
function HideNewIcons(){
  var fields,i;
  fields = document.getElementsByTagName('IMG');
  for( i = 0; i < fields.length; i ++ ) {
    var imgsrc = fields[i].getAttribute('SRC');
    if(imgsrc.indexOf("new.gif") != -1) {
     fields[i].style.visibility = "hidden";
    }
  }
}
[/script]
The problem occurs because most WSS v3 pages use a master page that contains the “body” element, and the page content code loads after the master page code. I didn’t know it at the time, but recently discovered (thanks to this article on the Microsoft SharePoint Products and Technologies Team Blog) that the SharePoint developers had given us a way to work around that issue—it’s the _spBodyOnLoadFunctionNames array. We can use JavaScript’s “push” method to load items into this array where they will run when the body’s onLoad event fires .Here is what the JavaScript looks like with the setTimeout replaced with a line that pushes the function name “HideNewIcons” into the _spBodyOnLoadFunctionNames array.
[script language="JavaScript"]
_spBodyOnLoadFunctionNames.push("HideNewIcons");
function HideNewIcons(){
  var fields,i;
  fields = document.getElementsByTagName('IMG');
  for( i = 0; i < fields.length; i ++ ) {
    var imgsrc = fields[i].getAttribute('SRC');
    if(imgsrc.indexOf("new.gif") != -1) {
     fields[i].style.visibility = "hidden";
    }
  }
}
[/script]
If you’ve been having trouble getting some of your legacy JavaScript scripts to run from within Content Editor web parts in WSS v3 or MOSS 2007 pages, give this technique a try, and let me know if it works for you.Monday, July 02, 2007
I've been Presented with the 2007 Microsoft® MVP Award for Windows SharePoint Services
The team I work with at SharePoint Solutions is the best in the industry. These folks are hard-working people who care not only about success on a professional level, but also keep perspective on the importance of family and solid values. The SharePoint Solutions team has trained literally thousands of students on the intricacies of SharePoint, helped hundred of organizations implement SharePoint environments, and delivered a wide variety of valuable software add-ons for the SharePoint platform. The owners and members of SharePoint Solutions sincerely care about their customers and colleagues.
My wife Bekkey has been incredibly supportive and tolerant of me over the years. There have been far too many evenings during which I paid only half as much attention to her as I should have, because I was doing some kind of research or work on the computer.
It is because I am lucky enough to work with this great team, and because I have been blessed with such wonderful people in my life that I’ve been presented with the WSS MVP award.
It takes a village, and the village I live in is the best. Thanks everyone!
Thursday, June 28, 2007
Select Multiple Categories for SharePoint Blog Posts
This is very easily accomplished. Remember that just about everything in SharePoint is just lists, and the blog posts and blog categories are no different.
By default, Blog posts only allow one category, which is displayed in a drop-down menu.

This should give you some clue about how to go about changing it. When you enter a new blog post, you are just adding a new item to a SharePoint list named "Posts", and "Category" is just one of the columns in that list--it is a Lookup column that looks up information from the Categories list.
To make the change, click on View All Site Content, and then click on Posts in the Lists section. When the default view for the Posts list loads, click on Settings, List Settings. This takes you to the page where you can edit all the properties for that particular list.
In the Columns section, click on Category.
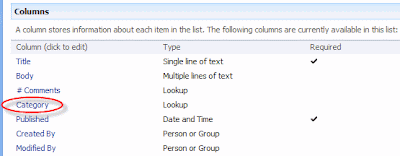
In the Additional Column Settings section, check the box beside Allow Multiple Values, and click the OK button.
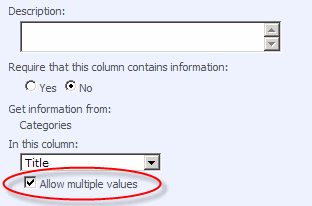
When you create a new Blog Post, you will see that the control changes to allow you to select multiple categories.
Tuesday, June 26, 2007
SharePoint Information Workers Conference 2008
The conference in January was a great success. We had a sellout crowd, great speakers and top-notch exhibitors. We had many attendees from Europe and beyond.
We are definitely going to host this conference again in early 2008 (January or February). We've been working for several weeks to nail down a venue and final dates and hope to be able to announce the details by July 1.
If you would like to be notified via email when we have the location and dates for the 2008 conference finalized, go here and fill out the notification request form.
Monday, June 25, 2007
SharePoint Server 2007 VHD image
http://www.microsoft.com/downloads/details.aspx?FamilyID=67f93dcb-ada8-4db5-a47b-df17e14b2c74&DisplayLang=en
Why does it matter to you? Well, you can use this virtual machine image to create a SharePoint Proof of Concept for your use case scenarios (among other uses).
Enjoy!
Friday, June 22, 2007
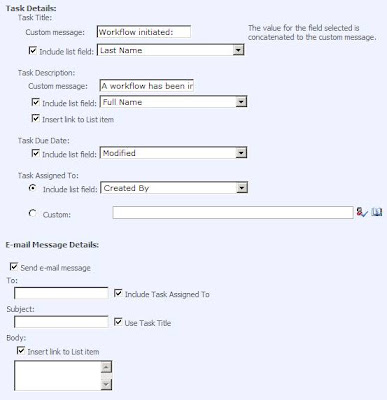
The Three-State Workflow - The Forgotten Out-Of-The-Box Workflow for Both WSS and MOSS

Once you have activated the Three-state workflow feature, it will be available as a workflow template to all your lists, libraries, and content types.

The Three-state workflow allows you to track the status of an item between three states. This is very useful when tracking issues, project tasks, leads, or other similar items.
I won't bore you with details on how to use it; Microsoft has already done an excellent job of explaining how to use the Three-state Workflow. My mission here is just to let you know that it exists. I will leave you with one small screenshot though, just to whet your appetite. Look at all the options you have for the task and email details for each transition step.
Enjoy!
Tuesday, June 12, 2007
TechEd Buzz, SharePoint Governance and Site Provisioning Assistant
“… the set of roles, responsibilities, and processes that you put in place in an enterprise to guide the development and use of a solution based on SharePoint Products and Technologies.”
Is SharePoint Governance on your mind? If so, we believe that our new Site Provisioning Assistant product for SharePoint 2007 may help you to get a bit more sleep at night. Just as SharePoint MVP Shane Young and Microsoft’s Joel Oleson were quick to point out upon viewing a demonstration of SPA from our TechEd booth, Site Provisioning Assistant provides key features to assist in your SharePoint Governance strategy.
In a recent blog Post, Joel Oleson identifies a key component to SharePoint Governance as:
“… Self Service approach to deployment (bottoms up) - how can I keep Help desk from being a bottleneck to information worker productivity.”
We couldn’t agree more, and that is exactly why we developed the SPA add-on for WSS v3 and MOSS 2007. With Site Provisioning Assistant, you can automate the process of handling requests for new WSS v3.0 and MOSS 2007 sites. As a SharePoint administrator, SPA provides you with a solution to these key questions:
- How can I enable our users to have the SharePoint sites they need in a timely manner, but maintain the integrity of our organization's taxonomy?
- How can I give my users an easy to use, consistent interface for requesting new SharePoint sites?
- How can I automate my organization's approval process for requesting new SharePoint sites?
For more information or to download an evaluation copy of SPA, visit the Site Provisioning Assistant Product home page.
Friday, June 01, 2007
Great new SharePoint book by Ted and Dan, see you at TechEd
The SharePoint book that I have been waiting for the most has finally arrived. It seems like Clinton was still president when I ordered it :), but this book was well worth the wait. Back when I first heard that Ted Pattision and Daniel Larson were teaming up to write a SharePoint book, I got pretty excited. I knew these guys would have a knock-out book for SharePoint developers, and I'm happy to say I was right.
With this book, you will learn how to:
- Build application pages and site pages
- Develop and deploy reusable Web parts to enable customization and personalization
- Exploit Windows SharePoint APIs to deploy Microsoft ASP.NET AJAX components
- Use XML and Collaborative Application Markup Language (CAML) to create provisioning components
- Design and implement custom document libraries
- Use Windows Workflow Foundation to create applications that automate business process
- Create Site Definitions to aggregate components and package them for deployment
- Implement Code Access Security, Trust Levels, authentication, and authorization
I hope that I get a chance to run into Ted and Daniel next week at TechEd in Orlando, to compliment them on the outstanding book. Are you going to TechEd? If so, please stop by our SharePoint Solutions booth and say hi. We'll be happy to demo our software add-ons for SharePoint, show you our training materials, talk about consulting, or just shoot the breeze. Our booth number in #254.
Wednesday, May 23, 2007
Need expert InfoPath knowledge?
One that stands out, in my mind, is actually an entire company that is devoted 100% to InfoPath consulting and solutions. InfoPath is ALL they do.
The company is Qdabra Software and they share their expert InfoPath knowledge on a public site they host named InfoPathDev.com. On this site, there are well over 100 "How-to" articles, tips and tricks. And, they don't write articles about "101" InfoPath topics. They write about the difficult issues that we all face when we try to implement an InfoPath solution in the real world.
There is a reason that Qdabra has all of this deep InfoPath knowledge. The company was founded and is owned by Patrick Halstead, one of the original development managers at Microsoft on the development of InfoPath v1. Also, Patrick is the author of the best advanced-level book on InfoPath 2003, Developing Solutions with Microsoft InfoPath. (If you follow this link to Amazon, you will find that the book has a rating of three-stars out of five. Don't be fooled by that. I've read the entire book from cover to cover and have used it extensively to develop InfoPath-based applications. It is not perfect, but it is by far the best text out there on advanced usage of InfoPath 2003).
So, while there still is a real shortage of expert-led classroom-style InfoPath training, there are some very good resources available on the Internet and InfoPathDev.com is one of the best.
(If you go to their site, you will see that a lot of the most recent tips are written in Japanese. If that is not your preferred language, keep searching their site because the tips in English still far outnumber the Japanese ones. The reason they are posting a lot of new tips in both Japanese and English is because InfoPath is BOOMING in Japan. :))
Wednesday, May 16, 2007
Branding SharePoint
But what if you are under the gun to do a SharePoint branding/customization job and you really need to absorb all of the details fast and get the job finished as soon as possible?
In my mind, you can't find a better solution than our Extreme Makeover SharePoint 2007 Edition course. It's a three-day class and will cost you roughly $2000, but you will leave with a thorough understanding of how to do this type of work and will have worked through numerous hands-on labs practicing the art.
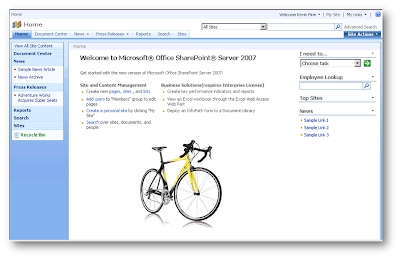
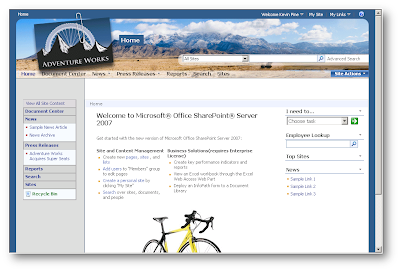
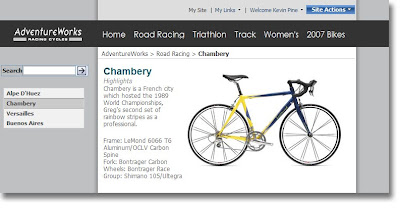
Since this course is all about the visual aspects of SharePoint 2007, maybe the best way to sell you on it is to show a before and after image of the kind of thing you will do in the class:
Before:
After:
Here's another one:
Here is a quick and dirty list of some of the topics that the course covers:
- The SharePoint 2007 CSS files and architecture
- Master Pages
- Page Layouts
- Site Definitions
- List Definitions
- Themes
- SharePoint Designer Customization of navigation and the UI
- The "Features" feature
On top of all this, the course was written and is taught by a true expert in SharePoint branding and customization. You won't often hear his name tossed around in the SharePoint Community, but he has as much, if not more, experience branding SharePoint as anybody out there.
His name is Kevin Pine and he has a background as a professional web site developer. For the past three years, he has been devoted full-time to SharePoint branding here at SharePoint Solutions. He wrote our Extreme Makeover 2003 course that was very successful and popular during 2003 - 2006. He has also done numerous SharePoint branding projects for our consulting clients including BP, Central Michigan University, Sarah Cannon Cancer Research Institute, and many others.
On top of all this, Kevin is an outstanding classroom teacher.
So, if you need to come up to speed quickly on all of the details and nuances of SharePoint 2007 branding and customization, in my opinion you can't find a faster and better way to do this than come take Kevin's class.
Wednesday, April 25, 2007
MSDN: Team-Based Development in Microsoft Office SharePoint Server 2007
For a few years now, our software engineering team here at SharePoint Solutions has been using a development environment similar to what Eric describes. Because we are geographically distributed, we rely on local virtual development environments (robust Dell laptops running Virtual Server 2005 RC2), that connect to Team Foundation Server over VPN. Prior to TFS and VPN, we used Visual Source Safe with SourceGearSourceOffSite and CruiseControl.NET. SourceOffSite was (barely) a workable solution, but now seems like the dark ages in comparison to Team Foundation Server. As for the source code vault itself, we take the approach of using a common mainline for team builds, with each of us working in isolated virtual build labs for incremental building and testing. We merge from our independent VBLs to the common Mainline, and kick off team builds for testing and release.
We are primarily focused on producing software solutions for redistribution, so every artifact and assembly we create must be packaged for deployment. In Visual Studio, our solutions are comprised of modified C# class library projects which have been customized to output SharePoint deployment packages (.wsp). Although the VSeWSS toolset has some nice conveniences, it just doesn’t provide us with the granularity we need for packaging commercial applications. A simple example of how we structure a project can be found in my October 2006 post Anatomy of a SharePoint WSS v3 Feature Project in Visual Studio 2005.
Finally, we depend on the WiX toolset for creating Windows Installer packages to distribute our software products. Here too, we use modified C# class library projects which have been customized to output MSI setup packages. The last step of our team build process zips up the appropriate outputs, then places them in a staging area where they await manual release to web (RTW).
Friday, March 30, 2007
Extranet Collaboration Manager - Standard Edition 1.0.0 Final has been Released to Web (RTW)
I wanted to thank the literally hundreds of SharePoint Solutions software customers who have helped us with Beta testing ExCM - SE over the past few months. Your input and assistance have been invaluable in helping us to release another quality add-on product for SharePoint 2007.
For full details on the features and functionality of ExCM - SE 1.0.0, please visit its product home page.
Wednesday, March 07, 2007
Latest Release of ExCM - SE for SharePoint 2007 Adds User Profile Management
Many of our software customers have been asking for us to add user profile management capabilities to the ExCM - SE product. As a result, with this latest release you can now define custom user profile properties of text, date and yes/no data types. You are further able to configure user profile fields as required or optional for users to complete when registering for access to your site. As well, you can apply a custom validator to your user profile properties, requiring data to be input in a specific format. From your users' perspective, you can now enable them to manage their own profile properties by selecting a menu item on SharePoint 2007's Welcome menu.
Adding functionality such as user profile management in ExCM - SE illustrates that we appreciate the feedback we receive from our software customers, and we will continue to take you seriously when we make design decisions for our products.
Thursday, February 22, 2007
Extranet Collaboration Manager for SharePoint 2007
The solution to the challenges you are facing is our new Extranet Collaboration Manager for SharePoint 2007 product. ExCM comes in two versions - Standard Edition and Enterprise Edition.
- ExCM - Standard Edition provides you with a suite of tools to Simplify SharePoint 2007 extranet user access and management. See the ExCM product page for more details.
- ExCM - Enterprise Edition allows your users to submit a request when he or she would like to have a new SharePoint 2007 site provisioned. You can easily associate custom workflows with the new site requests, asking for approval prior to site creation. Once a site request is approved, ExCM - EE will automatically provision the site for you using any SharePoint 2007 site definition you have specified.
We are actively seeking organizations which are interested in using ExCM - SE to augment the collaborative capabilities of their SharePoint 2007 extranet, and are willing to particpate with us in an implementation case study. Upon completion of the case study implementation, we would want to interview the salient participants and reference them in one or more press releases. If you are interested in working with our team of SharePoint experts to implement ExCM - SE in your SharePoint 2007 extranet, please contact me for further discussion.
Wednesday, February 21, 2007
New SharePoint BI Course
Microsoft has poured many man hours into deepening the integration between MOSS 2007 and its SQL Server and Excel Services business intelligence tools, but to-date has not provided publicly available classroom training on how all of this is designed to work, best practices and tips and tricks.
We have just completed work on a course to do just that: Building Reporting Portals and BI Dashboards with SSRS, Excel Services and MOSS 2007. You can read the full course outline here.
I think this is going to be an outstanding course (first class to be conducted in Nashville, TN on March 6 - 8 and to be conducted regularly in Nashville, Chicago and Dallas thereafter). One of the reasons I think this course will be very good is due to the deep BI experience of the author and lead instructor, Paul Vaughn.
Paul is a 20-year industry veteran and has spent the last four years developing a multi-terabyte data warehouse for a large healthcare company here in Nashville. Nashville is a hot spot for the healthcare industry (the world's largest for-profit hospital chain, HCA, is headquartered here) and the healthcare industry is a huge user of BI applications and technologies. So, Paul has some very relevant and first-hand practical experience to share with his students. This all adds up to an outstanding learning opportunity for those wanting to develop industrial-strength BI applications with MOSS 2007 as the delivery mechanism.
Thursday, February 01, 2007
Great example of Office System integration
I think the way Microsoft continues to enhance the integration between all of the Office programs and SharePoint may be the #1 reason why the Office System stands out from the crowd. To this end, I demo'd an application that I developed easily and with no code. The application featured my Pocket PC Phone running Windows Mobile 5.0, OneNote 2007 Mobile, OneNote 2007 on my laptop, MOSS 2007 and Outlook 2007.
In a nutshell, the application involves using the Pocket PC Phone's camera and OneNote Mobile to snap and store a picture of an expense receipt. Then Activesync automatically adds the note to OneNote on the laptop and I quickly annotate the image of the receipt. After that, I publish the OneNote page with the image to a SharePoint document library for the project the receipt relates to. The document library has the out-of-the-box MOSS Approval workflow setup to route the receipt for approval through my boss and then to accounting for reimbursement. Once the approval workflow kicks in, my boss never has to go to the document library to do his part. Instead, he is notified automatically by the workflow via Outlook 2007 and can approve the receipt right in Outlook.
This is the type of application that would have previously required hundreds of development hours to custom develop. Now, all of the pieces are baked right into the Office System. Way to go Office team in Redmond! After the demo, one of the Information Workers in the conference held up a sign with a 9.5 score (out of 10) on it. I took it as a compliment, but who knows, maybe he thought he was judging a figure skating competition :).
