Nearly all organizations which implement SharePoint® seek to automate business processes by taking advantage of its workflow capabilities. Many of these same companies quickly discover that although the plumbing is there to create robust workflows in SharePoint Designer, more tools are needed to effectively automate their processes. At that point a few options come to mind: companies can either pay programmers to author custom workflow activities, or they can purchase an expensive third party add-on for workflow. As a welcomed alternative, SharePoint Solutions' Workflow Essentials now provides you with a proven reliable, less expensive way to augment SharePoint Designer's workflow capabilities.
Workflow Essentials is a suite of activities and conditions that will enable you to create effective, useful workflows in SharePoint Designer. SharePoint Solutions' experts have spent thousands of hours consulting for companies with workflow requirements similar to yours. Our instructors have taught hundreds of students how to better leverage SharePoint workflows for process automation. By working with our customers and students to understand their business needs, we have developed a SharePoint add-on product containing custom workflow activities and conditions that you will find indispensable.
Workflow Essentials installs to your SharePoint server and provides several new activities and conditions for you to use on the design surface of Workflow Designer in SharePoint Designer. There is no additional workflow design application for you to install or learn, you simply continue using the familiar SharePoint Designer interface for creating your workflows. With Workflow Essentials installed, you'll have more than two dozen additional activities and conditions from which to choose from. These activities will allow your workflows to create SharePoint sites; move and copy list items; query user properties from both SharePoint and Active Directory; send e-mail attachments; manipulate item permissions; and much more.
Learn more about Workflow Essentials and download the public Beta
Friday, November 21, 2008
Thursday, November 20, 2008
How to Use SharePoint Discussion Boards in Outlook 2007
As you can imagine, we are heavy SharePoint users here at SharePoint Solutions. Much of the work we all do every day is done with SharePoint. Unlike our instructors, consultants, and developers, everyone isn't a SharePoint expert. Just like in your own organization, we have many Information Workers. Recently, we've been utilizing SharePoint Discussion Boards more. So I sent an email to our internal staff letting them know they may find these discussion boards easier to use if they connect them to Outlook 2007. In that email, I also included brief directions on how to do the most common tasks. Someone suggested that our blog readers might also be interested in those instructions, so here they are. Enjoy!
How to Connect a SharePoint Discussion Board to Outlook 2007
- While viewing a particular discussion board, click on Actions, Connect to Outlook.
- Depending on your operating system and how it is configured, you may receive a dialog warning that, "A website wants to open web content using a program on your computer." If you receive this dialog box, click the Allow button.
- In Outlook 2007, you will receive a dialog box asking you if want to, "Connect this SharePoint Discussion Board to Outlook?" Click the Yes button.
- If you have other SharePoint Discussion Boards you want to connect to Outlook 2007, you will need to repeat steps 1 through 3 for each of them. Each of your users will need to manually connect their discussion boards in this manner—I'm not aware of any way to push this out automatically for them.


- After you have connected your SharePoint Discussion Boards to Outlook, you will notice they are now listed in the Mail section of your Outlook Navigation Pane in a folder named SharePoint Lists. Discussion Boards that have messages you haven't yet read will appear in a Bold typeface. This allows you to quickly see where there are items you need to read without having to go to the SharePoint site in a browser. In the example below, you can see that there are no unread messages in Sales Leads Discussion, but there are 4 unread messages in the Sales Training Discussion.
- When you click on the name of a particular discussion board in the Outlook Navigation Pane, you will view the message headers in a threaded view in Outlook's List Pane. Individual posts that you haven't read will appear in a Bold typeface in this list. Each conversation will be grouped together and replies will appear indented beneath the item that was replied to. In the screenshot below, you'll notice that everything has been read except for the two items by Gail and Ryan in the conversation on "Great Book: Tribes by Seth Godin." Ryan posted a reply to Gail's initial comment; therefore his reply is indented below it.
- Just like reading email, when you click on a particular item in the List Pane, you can read it in the Outlook Preview Pane. You can also double-click on the item in the List Pane to open it in its own window.


- To reply to a post you are viewing in the Preview Pane, click on the Post Reply button in the Toolbar.
- If you have opened a post in its own window, you can reply clicking on the Post Reply button in the Ribbon.
- When you click on either of the Post Reply buttons in steps 1 or 2, a new window will open for you to type your message. When you are ready to post your reply to the server, click on the Post button. You will see your post in Outlook, and it will also be posted to the discussion boards in SharePoint as well. Note: To keep things clean and easier to read, I usually delete my signature and the copy of the text to which I am replying. I see no reason to clutter the space with this information. It's a personal choice though, and certainly up for debate, but let's not debate it here. :-)


- To create a new post (i.e. start a new conversation that is not a response to a previous discussion), in the Outlook Navigation Pane carefully select the discussion board to which you want to post. It is important that you select the correct discussion board first!
Then click the New (New Post in this Folder) button in the toolbar.
- A new window will open where you can enter the subject for your new post and type the message body. When you are done, click the Post button.


As with regular messages in Outlook you can do things like mark posts as read or unread. For the real power users, you can do much more such as create custom views that only show you posts you haven't read yet. Outlook 2007 puts you in full control of your SharePoint discussion board experience. Make it work the way the way that is most efficient and productive for you!
Thursday, November 13, 2008
Understanding Calendar Columns in a SharePoint List Calendar View
Last week, one of my students asked me about the Calendar Columns when creating a Calendar View on a SharePoint list. In the particular exercise we were doing, all the columns were set exactly the same. Although this was a good choice for the task at hand, it didn't demonstrate how the different options show up differently in the monthly, weekly, and daily views. To understand this, you really need to see it with screenshots, so here is an example.
 On my SharePoint site, I've created a custom list named Vehicle Reservations. This list has columns named Purpose, Vehicle, Reservation Date, Driver, and Vehicle and Driver.

In my new view, I set the following parameters:

Now, let's see how those this information shows up in the Month, Week, and Day views:
In the Month view, you only see the name of the car.

In the Week view, you see the car and the driver's name.

In the Day view, you see the car, the driver, and purpose.

I hope this clears up a few things for some of you who have wondered about how the calendar view options and settings work.
On my SharePoint site, I've created a custom list named Vehicle Reservations. This list has columns named Purpose, Vehicle, Reservation Date, Driver, and Vehicle and Driver.- The Title column was renamed to Purpose.
- The Vehicle column is of type Choice with options of: Car 1, Car 2, Car3, and Car 4.
- The Reservation Date column is of type Date and Time and uses the Date Only format.
- The Driver column is of type Text. I was going to make it of type Person or Group, but that type isn't available for calculations.
- The Vehicle and Driver column is of type Calculated. I use the formula =CONCATENATE([Vehicle]," - ",[Driver]) to create a single string with the vehicle name and the driver name with a hyphen and spaces between them.
In my new view, I set the following parameters:
- In this scenario, vehicles are reserved on a daily basis. So I selected the Reservaton Date column for both the Begin and End dates.
- In the Month view, I only want users to see which cars are reserved on particular days. So for the Month View Title, I selected the Vehicle column.
- In the Week view, I want users to be able to easily see who will be driving each vehicle. So for the Week View Title, I selected the Vehicle column, and for the Week View Sub Heading, I selected the Driver column.
- In the Day View, I want users to easily see who is driving which vehicle and also the purpose of the trip. So for the Day View Title, I selected the Vehicle and Driver calculated column, and for the Day View Sub Heading, I selected the Purpose column.

Now, let's see how those this information shows up in the Month, Week, and Day views:
In the Month view, you only see the name of the car.
In the Week view, you see the car and the driver's name.
In the Day view, you see the car, the driver, and purpose.
I hope this clears up a few things for some of you who have wondered about how the calendar view options and settings work.
Thursday, October 30, 2008
A SharePoint Conference for $100! Wow!
I just finished recording three sessions for the SharePoint Virtual Conference hosted by the SSWUG November 5, 6, and 7. You're really going to love this conference!

And best of all is the price! It's only $100! Since it's an online virtual conference you won't even have travel expenses. Even if you only watch one or two sessions, the content should be well worth the price.
If you enter the VIP Code: RSPEVIP, you'll save $10 and the cost will be only $90!
I like to honest, so I should probably disclose that I'll get $5 if you use that code too. But don't use it for that reason—use it to save yourself $10! J
The conference is November 5, 6, and 7, so register today!
I had a blast working with the folks in the studio. If you're would like to get some idea of what the conference presentations will be like, you can watch the first 10 minutes of my presentation on Getting Started with SharePoint Master Pages for free! Here are the summaries for my sessions:
- Complete Business Process Automation – For the past five years, InfoPath has been a wonderful tool for rapid development of electronic forms. With InfoPath Forms Services, those forms can now be rendered in a browser without the need for end users to need to know how to use the InfoPath desktop client. When InfoPath forms are saved to a SharePoint Form Library, the data form data can also be made available to SharePoint and to no-code workflows created with SharePoint Designer. In this session, you will see how Information Workers can now automate the entire business process using these client-side and server-side technologies.
- Getting Started with SharePoint Master Pages – SharePoint provides a fantastic way of controlling the design of SharePoint sites through functionality known as Master Pages. However, Master Pages can be tricky to understand when you first begin creating them. In this module, you'll see how to modify an existing Master Page by changing its layout, adding controls, and custom CSS (Cascading Style Sheet) code. Then you'll see how to apply it to a SharePoint site.
- SQL Server and SharePoint Data Integration – SharePoint's Data View web part can do much more than just view data. It can serve as a complete front-end to your SQL Server (and other data store) information allowing you to create robust applications without writing code. In this session, you will see just how to create such an application including conditional graphics. You'll even learn how to pass data from SQL Server into a SharePoint Designer workflow for business process automation.
I hope to see you there!
Monday, October 27, 2008
InfoPath Pattern matching - “Email” field
While teaching the InfoPath/Workflow class last week, I had the need to restrict a textbox control in an InfoPath form to only contain emails. If an invalid email is inserted, it should throw a validation error. Out of the box, the patterns provided by InfoPath are very limited. It only provides patterns for Phone Number, SSN, and Zip code:

I thought surely somewhere out on the web I would find the pattern needed for this, but to my surprise, I couldn't find "a working one" (doesn't mean that it doesn't exist, but I just couldn't find one after an extensive search). Here are the ones I did find and either they just didn't work or were limiting in nature:
.+@.+\..+
This might not catch All types of invalid emails, but it does catch quite a lot of them. Hope this post helps someone experiencing the same frustration as I did last week.
I thought surely somewhere out on the web I would find the pattern needed for this, but to my surprise, I couldn't find "a working one" (doesn't mean that it doesn't exist, but I just couldn't find one after an extensive search). Here are the ones I did find and either they just didn't work or were limiting in nature:
- http://bharatsukhwal2000.spaces.live.com/blog/cns!CDD1BF7F2239C3B!213.entry
- http://www.eggheadcafe.com/software/aspnet/29731834/email-fomatting-pattern.aspx
- http://www.infopathdev.com/forums/p/2868/6062.aspx
.+@.+\..+
This might not catch All types of invalid emails, but it does catch quite a lot of them. Hope this post helps someone experiencing the same frustration as I did last week.
Wednesday, October 15, 2008
Task Escalation using Workflows
I was recently showing one of the students in my class (who, by the way, was one of four students that traveled all the way from Ghana to attend four different SharePoint Solutions classes) how to assign tasks and escalate the tasks using a SharePoint Designer workflow. Before we started, he was convinced that they needed to do this in Visual Studio. I quickly told him "that's completely doable with a SharePoint Designer workflow" and began showing him a quick demo of how to do it.
When you create workflows that assign tasks and you want to escalate those tasks to other people when the tasks are not completed in a certain time period, it is best to use an additional list that stores this configuration information. You only want to create the workflow once and, if the people change over time, simply update a SharePoint list with the new people (and time periods).
So, let's begin by creating our list that drives the assignment of tasks and their escalation. Here's a list for our four regions: North, East, South and West. In the list we have three levels; the first person to assign the task to, the second person to escalate the task to and the final person (head honcho) that will get the task if the first two fail to perform their duties in the prescribed time periods. These time limits are defined as: 1st Person Task Time and 2nd Person Task Time, which define how many hours (or minutes or days) we want to give each person before escalation occurs.

I got bit doing this the first time and I'm not sure why. When I created and used an Issues list, SharePoint didn't want to set the "Assigned To" field during the workflow. However, when I recreated the issues list and tried again, it worked. Not sure why.
Anyway, I created an Issues list because it has all the columns you would need for creating a "trouble ticket."

On the trouble ticket issues list, I created a matching field called Region, because tickets are opened up for a region and assigned to a person that is responsible for the region. In this case I created a lookup field on Region in the Escalation List.
The first thing I want to do in my workflow is to assign the issues list item (we'll refer to it as the trouble ticket) to the first person AND assign them a task. Let's start with assigning the trouble ticket to the first person.
Create a new workflow on the list and automatically start it when an item is created.

In the first step, we're going to Set Field in Current Item (i.e. we are going to set the "Assigned to" field).

Now we begin the lookup on who we're going to assign the item to.

Here's the final lookup definition. We are selecting 1st Person from Escalation List where Escalation List:Region = Trouble Tickets:Region. In SQL syntax:
Select
[1st Person]
From
[Escalation List]
Inner Join [Trouble Tickets]
ON [Escalation List].Region = [Trouble Tickets].Region


We know this is not guaranteed to return a single value, except for the fact that in our Escalation list we only have ONE record for each region; therefore, we are guaranteeing it to be unique.
Okay, now let's add a trouble ticket and see what happens!

Hey, it works! (This is the part that didn't work for me the first time I did it. Hmmmm…). So, you can see that the first part of our workflow is functional. Whenever a person creates a trouble ticket, it is automatically assigned to the person in the list. Can you imagine creating a time window for each person (1st shift, 2nd shift, 3rd shift)? The correct person could be assigned based on when the ticket was created. Perhaps these people are in different time zones…just food for thought.
Okay, let's work on the next step. The next step will assign a task to the first person in the Escalation list. This is the same person that the trouble-ticket was assigned to.

The task is assigned to the same person as the trouble ticket, so the workflow lookup will be the same.


We could, of course, add other actions that would execute after the task was completed, but for the sake of brevity, we'll stop here. If the option is turned on in the task list to send an email when the task is assigned, then you don't have to create a custom email in the workflow (assuming, of course, the out-of-the-box email works for you).
When we create a new trouble ticket, we can see that the Assigned To is completed (Jose Curry) and checking our Tasks list we see that Jose has also been assigned a task.


Now for the next, and most important, step. In order for the task to be reassigned (escalated) after a time period, we need to create a workflow on the tasks list. This workflow will start when a new item is created and pause until the time period has expired. At this point, it will perform a test to determine if the task should be escalated.
Create the workflow on the Tasks list.

Here's the completed lookup. We want to select the 1st Person Task Time from Escalation List where the Region in the Escalation List matches the Region in the Trouble Tickets list.


We can find the Region in the Trouble Tickets list because the Current Item (our task) has a reference back to the ID of the item that created the task (Workflow Item ID). This is a very important concept of which to be aware when you are creating workflows and tasks. Each task has a reference back to the ID of item that created the task. Therefore, you can always "find" the original item that relates to the task and use the information from the original item to drive your workflow.
Our "Pause for duration" step shows that we will pause the workflow for the number of minutes (we could have just as easily used hours or days) specified in the 1st Person Task Time field of the Escalation List. After pausing, we'll perform a test to determine if the task needs to be reassigned (escalated). We'll perform this test by checking to see if the status has been changed to something other than "Not Started." If the task is reassigned, we'll also send an email to the 1st Person (copying the 2nd Person and 3rd Person) informing them they have failed and the task has been reassigned to someone more capable (actually the 1st Person was on vacation). Before doing this we'll assign some variables to the people involved so we don't have to perform the lookups multiple times.

Assign some variables to lookups to avoid doing the lookup work multiple times.

Here's an example lookup to find the 2nd Person in the Escalation List.


Next we'll send an email to the original "Assigned To" on the Trouble Ticket list informing them the task has be reassigned to another person. Again we'll use the variables we created to assign the To: and CC: fields.

Now we just need to compile the workflow and test it by waiting the appropriate amount of time. We can see that the task has been assigned to Patricia and is "In Progress."

Pausing for 5 minutes…

After 5 minutes (more or less, as pausing is a "lazy" process), we see that the task is now assigned to Gail. Additionally Gail will be copied on an email notifying her of the task reassignment.

So, that is one way task escalation can be handled. To handle the next level of task reassignment, you'll need to either add additional steps in the workflow to pause the workflow and then perform another check, or start multiple workflows that will handle each case.
That was easy!
When you create workflows that assign tasks and you want to escalate those tasks to other people when the tasks are not completed in a certain time period, it is best to use an additional list that stores this configuration information. You only want to create the workflow once and, if the people change over time, simply update a SharePoint list with the new people (and time periods).
So, let's begin by creating our list that drives the assignment of tasks and their escalation. Here's a list for our four regions: North, East, South and West. In the list we have three levels; the first person to assign the task to, the second person to escalate the task to and the final person (head honcho) that will get the task if the first two fail to perform their duties in the prescribed time periods. These time limits are defined as: 1st Person Task Time and 2nd Person Task Time, which define how many hours (or minutes or days) we want to give each person before escalation occurs.
I got bit doing this the first time and I'm not sure why. When I created and used an Issues list, SharePoint didn't want to set the "Assigned To" field during the workflow. However, when I recreated the issues list and tried again, it worked. Not sure why.
Anyway, I created an Issues list because it has all the columns you would need for creating a "trouble ticket."
On the trouble ticket issues list, I created a matching field called Region, because tickets are opened up for a region and assigned to a person that is responsible for the region. In this case I created a lookup field on Region in the Escalation List.
The first thing I want to do in my workflow is to assign the issues list item (we'll refer to it as the trouble ticket) to the first person AND assign them a task. Let's start with assigning the trouble ticket to the first person.
Create a new workflow on the list and automatically start it when an item is created.
In the first step, we're going to Set Field in Current Item (i.e. we are going to set the "Assigned to" field).
Now we begin the lookup on who we're going to assign the item to.
Here's the final lookup definition. We are selecting 1st Person from Escalation List where Escalation List:Region = Trouble Tickets:Region. In SQL syntax:
Select
[1st Person]
From
[Escalation List]
Inner Join [Trouble Tickets]
ON [Escalation List].Region = [Trouble Tickets].Region
We know this is not guaranteed to return a single value, except for the fact that in our Escalation list we only have ONE record for each region; therefore, we are guaranteeing it to be unique.
Okay, now let's add a trouble ticket and see what happens!
Hey, it works! (This is the part that didn't work for me the first time I did it. Hmmmm…). So, you can see that the first part of our workflow is functional. Whenever a person creates a trouble ticket, it is automatically assigned to the person in the list. Can you imagine creating a time window for each person (1st shift, 2nd shift, 3rd shift)? The correct person could be assigned based on when the ticket was created. Perhaps these people are in different time zones…just food for thought.
Okay, let's work on the next step. The next step will assign a task to the first person in the Escalation list. This is the same person that the trouble-ticket was assigned to.
The task is assigned to the same person as the trouble ticket, so the workflow lookup will be the same.
We could, of course, add other actions that would execute after the task was completed, but for the sake of brevity, we'll stop here. If the option is turned on in the task list to send an email when the task is assigned, then you don't have to create a custom email in the workflow (assuming, of course, the out-of-the-box email works for you).
When we create a new trouble ticket, we can see that the Assigned To is completed (Jose Curry) and checking our Tasks list we see that Jose has also been assigned a task.
Now for the next, and most important, step. In order for the task to be reassigned (escalated) after a time period, we need to create a workflow on the tasks list. This workflow will start when a new item is created and pause until the time period has expired. At this point, it will perform a test to determine if the task should be escalated.
Create the workflow on the Tasks list.
Here's the completed lookup. We want to select the 1st Person Task Time from Escalation List where the Region in the Escalation List matches the Region in the Trouble Tickets list.
We can find the Region in the Trouble Tickets list because the Current Item (our task) has a reference back to the ID of the item that created the task (Workflow Item ID). This is a very important concept of which to be aware when you are creating workflows and tasks. Each task has a reference back to the ID of item that created the task. Therefore, you can always "find" the original item that relates to the task and use the information from the original item to drive your workflow.
Our "Pause for duration" step shows that we will pause the workflow for the number of minutes (we could have just as easily used hours or days) specified in the 1st Person Task Time field of the Escalation List. After pausing, we'll perform a test to determine if the task needs to be reassigned (escalated). We'll perform this test by checking to see if the status has been changed to something other than "Not Started." If the task is reassigned, we'll also send an email to the 1st Person (copying the 2nd Person and 3rd Person) informing them they have failed and the task has been reassigned to someone more capable (actually the 1st Person was on vacation). Before doing this we'll assign some variables to the people involved so we don't have to perform the lookups multiple times.
Assign some variables to lookups to avoid doing the lookup work multiple times.
Here's an example lookup to find the 2nd Person in the Escalation List.
Next we'll send an email to the original "Assigned To" on the Trouble Ticket list informing them the task has be reassigned to another person. Again we'll use the variables we created to assign the To: and CC: fields.
Now we just need to compile the workflow and test it by waiting the appropriate amount of time. We can see that the task has been assigned to Patricia and is "In Progress."
Pausing for 5 minutes…
After 5 minutes (more or less, as pausing is a "lazy" process), we see that the task is now assigned to Gail. Additionally Gail will be copied on an email notifying her of the task reassignment.
So, that is one way task escalation can be handled. To handle the next level of task reassignment, you'll need to either add additional steps in the workflow to pause the workflow and then perform another check, or start multiple workflows that will handle each case.
That was easy!
Thursday, August 14, 2008
It’s All About You
 by Randy Moody
 Living in Nashville, Tennessee, is cool in a lot of ways. It’s hard to walk five steps in this city wi9hout bumping into somebody who is in the music business.
One night I unwittingly attended the CD Pre-Release Party of a country “used-to-be-a-star” who has a “comeback CD” ready for release in a couple of months. It was advertised by the venue on its website as a “free show” and I thought, “Sure. Why not?” I like some of the guy’s music and thought it was pretty cool that he was singing for free.
Well, he wasn’t singing for free. He was talking about how great the CD was and how cool it was that he was going to be releasing all these great tunes, most of which he wrote, which were being played at about 90 decibels through the PA system. And how his “new contemporary” sound was going to take the Country Music world by storm. It was a “let’s celebrate how cool I am” show.
So what I got for “free” was (from the user side) the equivalent of buying a twelve dollar dinner and listening to his songs on my iPod turned up REALLY LOUD, and hearing him elaborate on what a great singer and writer he is. I could have had THAT free show at home, and not paid for a $12 meal!
Pretentiousness is always repellant. And it is an absolutely universal fact that pretentious people don’t know they are pretentious. They see themselves as “relevant,” “important,” and “impactful.” And they strive diligently to make you see them that way.
I’ve been to training classes with instructors like that. Have you?
You won’t get that with our instructors at SharePoint Solutions. They’re not out to impress you. They’re out to help you become a skilled SharePoint user. It’s not about them, it’s about you.
Here’s what the students themselves are saying:
- “Ricky was very knowledgeable and personable as well. I felt comfortable in class almost immediately. Ricky is the real deal.”
- “Although I am sure you have many qualified and talented instructors, I would request Tracey and Robert again. They were both very knowledgeable in what they were teaching, very approachable, and both had a great sense of humor.”
- “Jeff was phenomenal. Everyone loved him and he greatly helped us. It was great and very much worth the money invested.”
Students consistently find each of our instructors friendly, down-to-earth, approachable, and genuinely helpful. The kind of person who is easy to learn from.
When you learn from SharePoint Solutions instructors, you’re learning from the best.
(But THEY won’t tell you that.)
Tuesday, August 12, 2008
New Course on Business Data Catalog and Enterprise Application Integration
We have a new course in development that is scheduled to launch to the public on September 30.
 The course, Objective: Integration - Using MOSS and the Business Data Catalog (BDC) for Enterprise Application Integration, is targeted at MOSS Solution Designers and Administrators who have caught the vision that MOSS 2007 can be an excellent "hub of integration" for pulling together disparate enterprise data into a common user experience - namely MOSS.
This course sprang out of A) our experience with teaching our MOSS BI course: BI Revolutions: The MOSS Business Intelligence Toolset, and B) consulting projects we have done over the past couple of years to help our clients use MOSS as a hub for enterprise application integration - particularly, in relation to implementing the Business Data Catalog (BDC).
We believe this will be the first classroom-style, expert-led public training class in the market for advanced MOSS training that focuses 100% on using MOSS to enable enterprise application integration.
If you have taken one of our courses before, you know that we invest heavily in the design and engineering of the curriculum because we strongly believe that high quality curriculum can help a high quality instructor do the best job possible. The training industry in general has forgotten this and tends to crank out mediocre curriculum because it is the easy and cheap way to go. However, our students can be assured that they will receive the highest quality course materials in the industry when they take our classes.
You also may know that we truly put experts in the role of instructors. We have always viewed ourselves as expert consultants who also happen to be gifted teachers. All of our instructors are 100% devoted to teaching and consulting on MOSS. We don't do Exchange, we don't do Project Server, and we don't do Oracle or Java or any other kind of training or consulting. When you attend our classes, you can be assured that your instructor has deep expertise in both applying and teaching SharePoint.
If this subject is up your alley, I hope you will consider taking "Objective: Integration" sometime in the near future. After the September 30 launch in our Nashville location, we will be rotating the course around each month through our locations in Chicago, Dallas, Charlotte, Seattle and Boston.
The course, Objective: Integration - Using MOSS and the Business Data Catalog (BDC) for Enterprise Application Integration, is targeted at MOSS Solution Designers and Administrators who have caught the vision that MOSS 2007 can be an excellent "hub of integration" for pulling together disparate enterprise data into a common user experience - namely MOSS.This course sprang out of A) our experience with teaching our MOSS BI course: BI Revolutions: The MOSS Business Intelligence Toolset, and B) consulting projects we have done over the past couple of years to help our clients use MOSS as a hub for enterprise application integration - particularly, in relation to implementing the Business Data Catalog (BDC).
We believe this will be the first classroom-style, expert-led public training class in the market for advanced MOSS training that focuses 100% on using MOSS to enable enterprise application integration.
If you have taken one of our courses before, you know that we invest heavily in the design and engineering of the curriculum because we strongly believe that high quality curriculum can help a high quality instructor do the best job possible. The training industry in general has forgotten this and tends to crank out mediocre curriculum because it is the easy and cheap way to go. However, our students can be assured that they will receive the highest quality course materials in the industry when they take our classes.
You also may know that we truly put experts in the role of instructors. We have always viewed ourselves as expert consultants who also happen to be gifted teachers. All of our instructors are 100% devoted to teaching and consulting on MOSS. We don't do Exchange, we don't do Project Server, and we don't do Oracle or Java or any other kind of training or consulting. When you attend our classes, you can be assured that your instructor has deep expertise in both applying and teaching SharePoint.
If this subject is up your alley, I hope you will consider taking "Objective: Integration" sometime in the near future. After the September 30 launch in our Nashville location, we will be rotating the course around each month through our locations in Chicago, Dallas, Charlotte, Seattle and Boston.
EXACTLY where SharePoint documents are stored
Ever wonder EXACTLY where SharePoint stores documents? This isn't going to be news to developers or others that have followed SharePoint for a good while, but if you are relatively new to SharePoint it might be somewhat eye-opening.
Every time you hit "Save" on a Microsoft Office document and the path for the save is a SharePoint document library on a SharePoint site, the entire contents of the document is saved in binary format in a single image-type field in the SharePoint database. That's right, the entire document, up to 2 GB in size, is stuffed completely into a single field in the SQL Server database that SharePoint uses.
Want to know by the letter of the law that this is true? If you keep following the trail in the official documentation here is where you find it (click on the image to see it more clearly):
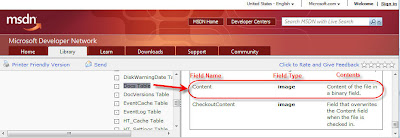
Here is the exact link to this page of the documentation on the Microsoft Developer Network:
http://msdn.microsoft.com/en-us/library/ms998690.aspx
(Note: the description of the Docs table on this page says that its function is to store metadata for the document. That's true, but it also stores the full contents of the document as well.)
The documentation is definitely not an exciting read, but it does tell the truth (in this case at least :) )
So, are you thinking "how can this possibly work in environments that have any kind of volume at all?". Well, as they say, that's a deep subject - especially depending on how far you want to delve down into it. In this short post, all I can say is that it indeed DOES work, if the environment is properly architected, and performs very well at incredibly high volumes.
Maybe one of my colleagues at SharePoint Solutions will jump in and write an easy-to-understand post on some of the technical reasons why this approach is able to work even at very high volumes?
Thursday, July 31, 2008
Microsoft Sharepoint “Tips of the Day”
Want a great place to get general Sharepoint tips and tricks? How about your Outlook mailbox?
Microsoft has made available a list of tips and how-tos for SharePoint, Sharepoint Designer, and InfoPath and of course, all the other Office products as well. Best of all, they are available by RSS feed, so you can have them delivered right to your Outlook mailbox.
You can choose which feeds you would like to subscribe to. Some of the most recent posts have included:
· How to Design an InfoPath Form based on XML Schema
· Create a workflow initiation form
· How to use variables in workflows
· How to export Excel data to a Sharepoint site
· Connect a Query String Filter to another Web Part
As you can see, the topics range from simple tasks to pretty substantial processes.
For a complete list of feeds and to choose what tips you would like to subscribe to, visit http://office.microsoft.com/en-us/help/CH102069101033.aspx.
Subscribe to:
Posts (Atom)